Module 01 · Getting Started with BootstrapBootstrap 入门
Hands-on Lab: Getting Started with Bootstrap动手实验:Bootstrap 入门
Estimated time needed: 30 minutes
所需估计时间:30 分钟
This lab provides you with two exercises.
这个实验室为您提供了两个练习。
- In the first exercise, you will download the precompiled Bootstrap files, set up Bootstrap for a project, and create a simple HTML file with two button Bootstrap components. Finally, you will verify that the Bootstrap elements are rendering properly in the browser.
在第一个练习中,您将下载预编译的 Bootstrap 文件,为项目设置 Bootstrap,并创建一个包含两个 Bootstrap 按钮组件的简单 HTML 文件。最后,您将验证 Bootstrap 元素在浏览器中的渲染是否正确。 - In the second exercise, you will use the CDN via jsDelivr to set up Bootstrap for the project and create an app to send questions to customer support and lookup help on technical documentation. You will also customize the elements. Finally, you will test the app to ensure it renders properly.
在第二个练习中,您将使用 CDN 通过 jsDelivr 设置 Bootstrap 项目,创建一个发送问题给客户支持和在技术文档中查找帮助的应用程序。您还将自定义元素。最后,您将测试该应用程序以确保其正确渲染。
Learning Objectives 学习目标
After completing this lab, you will be able to:
完成这个实验室后,您将能够:
- Download Bootstrap files 下载 Bootstrap 文件
- Set up Bootstrap 设置 Bootstrap
- Test the Bootstrap set up
测试 Bootstrap 设置 - Create a form with different Bootstrap elements
创建一个包含不同 Bootstrap 元素的表单 - Test the project output 测试项目输出
Prerequisites 先决条件
- Familiarity with HTML, CSS, and JavaScript
熟悉 HTML、CSS 和 JavaScript
Exercise 1: Download and set up Bootstrap in a project 练习 1:下载并设置 Bootstrap 到项目中
There are two main methods to download Bootstrap files:
有两种主要方法下载 Bootstrap 文件:
- Source files if you prefer to have more control over the customization and build process.
源文件,如果您更喜欢在自定义和构建过程中拥有更多控制权。 - Pre-compiled files if you want a quicker setup with ready-to-use files.
预编译文件,如果您想要更快的设置和现成的文件。
For this exercise, you will download the precompiled version of Bootstrap. You will follow the different steps in the process.
为此练习,您将下载预编译版本的 Bootstrap。您将遵循过程中的不同步骤。
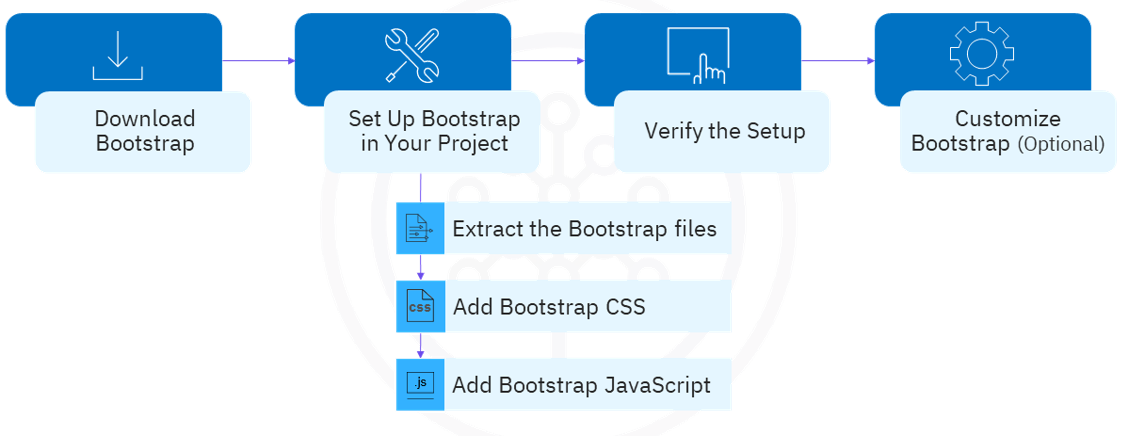
Task 1: Download Bootstrap 任务 1:下载 Bootstrap
- Launch to the official Bootstrap website.
启动至官方 Bootstrap 网站。 - On the Bootstrap Download page, click the Download button in the Compiled CSS and JS section.
在 Bootstrap 下载页面,点击编译 CSS 和 JS 部分的下载按钮。
Note: if the download doesn't start when you click on the "Download" button, simply right-click on the button and choose "Open link in new tab" This action will initiate the download process.
注意:如果您点击“下载”按钮后下载没有开始,请右键单击按钮并选择“在新标签页中打开链接”。此操作将启动下载过程。
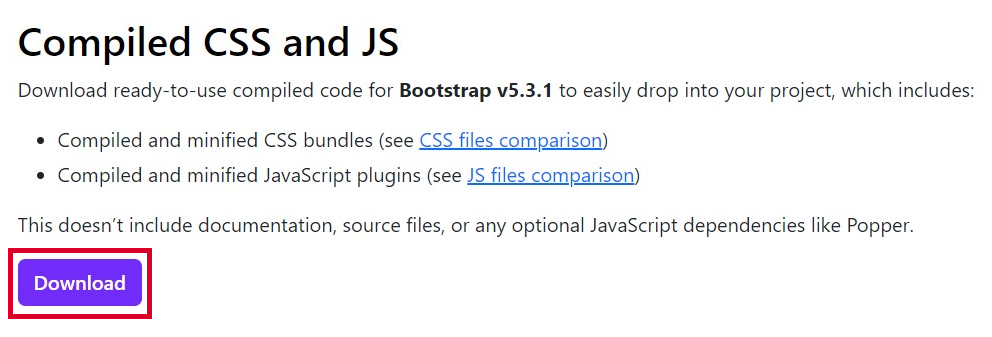
- The downloaded file will have a name in the format bootstrap-x.x.x-dist.zip, where x.x.x represents the Bootstrap version. An example of a version number is 5.3.1.
下载的文件将具有格式为bootstrap-x.x.x-dist.zip的名称,其中 x.x.x 代表 Bootstrap 版本。版本号的示例是 5.3.1。
Task 2: Set up Bootstrap in your project 任务 2:在你的项目中设置 Bootstrap
- Create the front-end project folder with the css and js subfolders.
创建前端项目文件夹,包含 css 和 js 子文件夹。 - Extract the files to a folder of your preference.
将文件提取到您偏好的文件夹中。
| |
| --- |
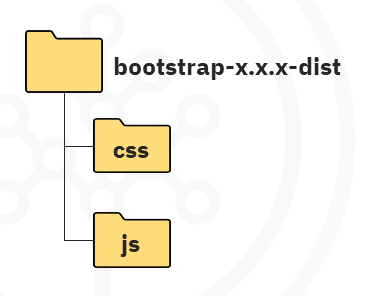
| Result: After extracting the files, you should see a folder structure in the format bootstrap-x.x.x-dist folder (where x.x.x represents the version number) containing the css and js, folders.
结果:提取文件后,您应该看到一个以 bootstrap-x.x.x-dist 文件夹(其中 x.x.x 代表版本号)格式的文件夹结构,包含 css 和 js 文件夹。 |
| |
- Next, you will need to add Bootstrap css to the project. Navigate to the css, where you will find several css files available as part of the pre-compiled package.
接下来,您需要将 Bootstrap CSS 添加到项目中。导航到 css 文件夹,您将找到作为预编译包一部分的多个 CSS 文件。 - Copy the bootstrap.min.css file.
复制 bootstrap.min.css 文件。 - Navigate to the project folder's css folder and paste the
bootstrap.min.cssfile.
前往项目文件夹的 css 文件夹,粘贴bootstrap.min.css文件。 - You will also need to add Bootstrap js to the project. Navigate to the js folder in the bootstrap-x.x.x-dist folder (where x.x.x represents the version number).
您还需要将 Bootstrap js 添加到项目中。导航到 bootstrap-x.x.x-dist 文件夹中的 js 文件夹(其中 x.x.x 代表版本号)。 - Copy
bootstrap.min.jsandbootstrap.bundle.min.js.
复制bootstrap.min.js和bootstrap.bundle.min.js。 - Navigate to the project folder's js folder and paste the
bootstrap.min.jsandbootstrap.bundle.min.jsfiles.
前往项目文件夹的 js 文件夹,粘贴bootstrap.min.js和bootstrap.bundle.min.js文件。
| |
| --- |
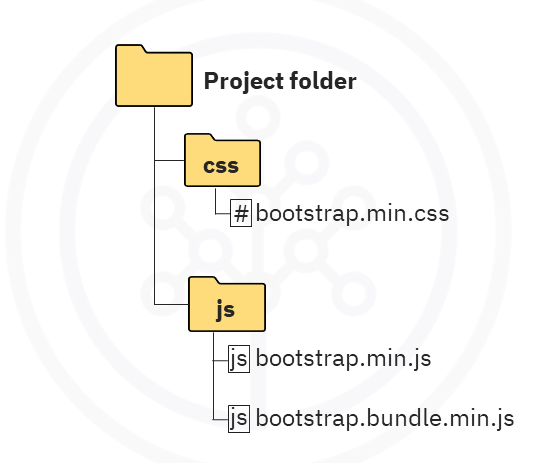
| Result: The folder structure should now contain the css and js files in the respective folders.
结果:文件夹结构现在应包含相应文件夹中的 css 和 js 文件。 |
| |
Task 3: Verify the Bootstrap setup 任务 3:验证 Bootstrap 设置
To verify the setup, you need to make sure that the output of an HTML file containing a Bootstrap element renders properly.
为确保设置正确,您需要确保包含 Bootstrap 元素的 HTML 文件的输出渲染正确。
- Create a simple HTML file named
bootstrap_test.html.
创建一个名为bootstrap_test.html的简单 HTML 文件。 - Add the
<link>tag to include the path to thebootstrap.min.cssfile.
添加<link>标签以包含bootstrap.min.css文件的路径。
<!-- Example <link> tag with the path --><link rel="stylesheet" href="css/bootstrap.min.css">
- Add
<script>tags to includebootstrap.min.jsandbootstrap.bundle.min.js.
添加<script>标签以包含bootstrap.min.js和bootstrap.bundle.min.js。
<!-- Example <script> tag with the path --><script src="js/bootstrap.min.js"></script><script src="js/bootstrap.bundle.min.js"></script>
- Include the
<!DOCTYPE html>,<html>, and<body>tags along with some basic HTML code.
包含<!DOCTYPE html>、<html>和<body>标签以及一些基本的 HTML 代码。
<!-- Example HTML code --><!DOCTYPE html><html><body><h1>Testing Bootstrap</h1><p>Verifying bootstrap functionality</p></body></html>
- Add a Bootstrap element, such as a button before the
</body>tag. For example, add<button type="button" class="btn btn-success">Success</button>and<button type="button" class="btn btn-warning">Warning</button>.
添加一个 Bootstrap 元素,例如在</body>标签之前添加一个按钮。例如,添加<button type="button" class="btn btn-success">Success</button>和<button type="button" class="btn btn-warning">Warning</button>。
Note: You can also add elements from the Components section on the official Bootstrap website.
注意:您还可以从官方 Bootstrap 网站上的组件部分添加元素。 - Save the file. 保存文件。
- Open the
bootstrap_test.htmlfile in a browser.
打开浏览器中的bootstrap_test.html文件。 - Did the file render properly?
文件渲染正确了吗?
Click here for how for validation pointers
请点击此处获取验证提示
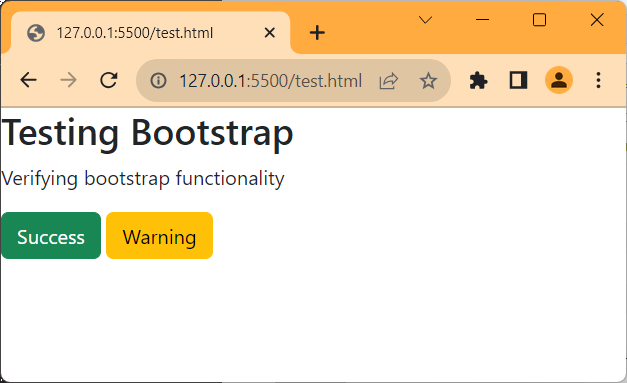
Congratulations! You have successfully set up the precompiled version of Bootstrap for your project. 恭喜!您已成功为您的项目设置了预编译版本的 Bootstrap。
Exercise 2: Set up Bootstrap via CDN and create a form using Bootstrap components 练习 2:通过 CDN 设置 Bootstrap 并使用 Bootstrap 组件创建表单
In this exercise, you will use the CDN via jsDelivr to set up Bootstrap in a project and create a basic form using Bootstrap elements, such as navigation bar, labels, input boxes, dropdowns, and buttons.
在这个练习中,您将使用 jsDelivr 通过 CDN 设置 Bootstrap 到项目中,并使用 Bootstrap 元素创建一个基本表单,例如导航栏、标签、输入框、下拉菜单和按钮。
Task 1: Set up Bootstrap for the project 任务 1:为项目设置 Bootstrap
- Create a new project folder named Customer_Support_form. Create a file named
customer_form.html.
创建一个名为 Customer_Support_form 的新项目文件夹。创建一个名为customer_form.html的文件。 - Add the
<!doctype html>,<html>, and<head>tags.
添加<!doctype html>、<html>和<head>标签。
<!doctype html><html> <head> </head></html>
- In the customer_form.html file, add the CDN link. To do this:
在 customer_form.html 文件中添加 CDN 链接。为此: - Navigate to the Download page in the official Bootstrap website.
前往 Bootstrap 官方网站的下载页面。 - Search for the CDN via jsDelivr section.
搜索 CDN 通过 jsDelivr 部分。 - Copy the CSS and JavaScript links. Here is an extract that you can use for the purposes of this exercise.
复制 CSS 和 JavaScript 链接。以下是可以用于本次练习的摘录。
```
<link href="https://cdn.jsdelivr.net/npm/bootstrap@5.3.1/dist/css/bootstrap.min.css" rel="stylesheet" integrity="sha384-4bw+/aepP/YC94hEpVNVgiZdgIC5+VKNBQNGCHeKRQN+PtmoHDEXuppvnDJzQIu9" crossorigin="anonymous"><script src="https://cdn.jsdelivr.net/npm/bootstrap@5.3.1/dist/js/bootstrap.bundle.min.js" integrity="sha384-HwwvtgBNo3bZJJLYd8oVXjrBZt8cqVSpeBNS5n7C8IVInixGAoxmnlMuBnhbgrkm" crossorigin="anonymous"></script>
```
- Paste the links in the
customer_form.htmlfile between the<head>and</head>tags.
粘贴链接到customer_form.html文件中的<head>和</head>标签之间。
Task 2: Create and customize the navbar for the app with Bootstrap components 任务 2:使用 Bootstrap 组件创建和自定义应用导航栏
- Add the
navbarcomponent from the Bootstrap website to your code within the<body> </body>tag. You will find this code in the navbar topic under the Components section.
将 Bootstrap 网站上的navbar组件添加到您的代码中的<body> </body>标签内。您可以在组件部分的 navbar 主题下找到此代码。
Click here for an example from the website
点击此处查看网站上的示例
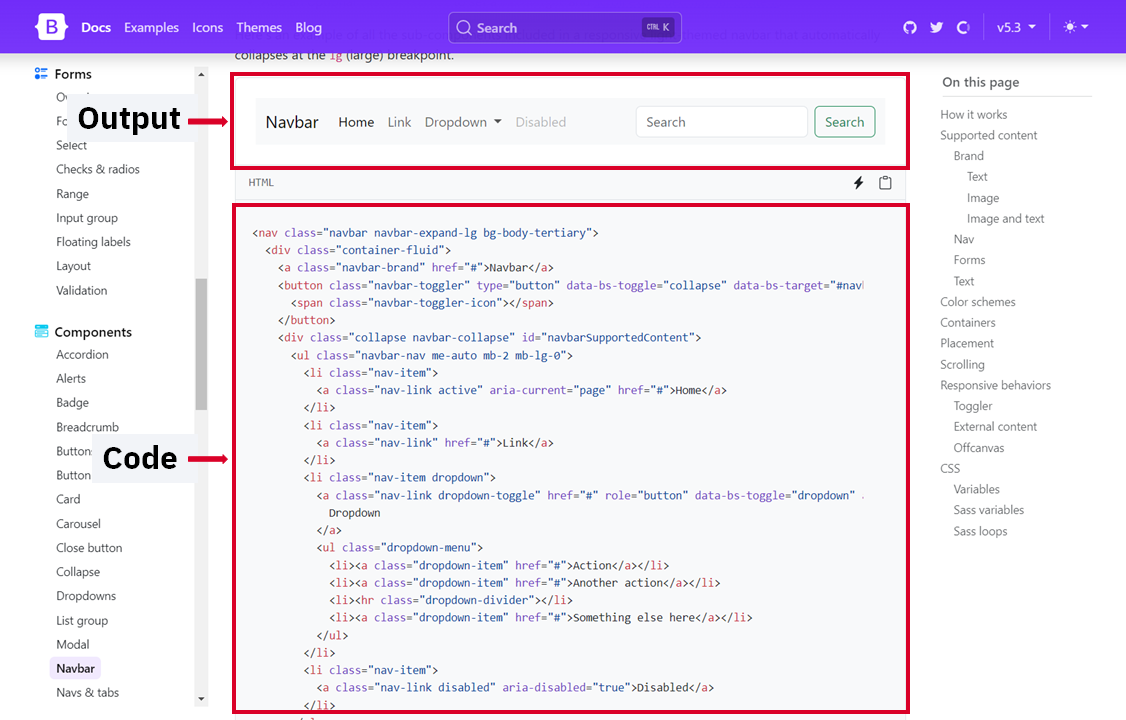
Here is an example code taken from the official Bootstrap site for thenavbarcomponent, which you can use in the exercise.
这里是一个从官方 Bootstrap 网站获取的navbar组件示例代码,您可以在练习中使用。
<nav class="navbar navbar-expand-lg bg-body-tertiary"> <div class="container-fluid"> <a class="navbar-brand" href="#">Navbar</a> <button class="navbar-toggler" type="button" data-bs-toggle="collapse" data-bs-target="#navbarSupportedContent" aria-controls="navbarSupportedContent" aria-expanded="false" aria-label="Toggle navigation"> <span class="navbar-toggler-icon"></span> </button> <div class="collapse navbar-collapse" id="navbarSupportedContent"> <ul class="navbar-nav me-auto mb-2 mb-lg-0"> <li class="nav-item"> <a class="nav-link active" aria-current="page" href="#">Home</a> </li> <li class="nav-item"> <a class="nav-link" href="#">Link</a> </li> <li class="nav-item dropdown"> <a class="nav-link dropdown-toggle" href="#" role="button" data-bs-toggle="dropdown" aria-expanded="false"> Dropdown </a> <ul class="dropdown-menu"> <li><a class="dropdown-item" href="#">Action</a></li> <li><a class="dropdown-item" href="#">Another action</a></li> <li><hr class="dropdown-divider"></li> <li><a class="dropdown-item" href="#">Something else here</a></li> </ul> </li> <li class="nav-item"> <a class="nav-link disabled" aria-disabled="true">Disabled</a> </li> </ul> <form class="d-flex" role="search"> <input class="form-control me-2" type="search" placeholder="Search" aria-label="Search"> <button class="btn btn-outline-success" type="submit">Search</button> </form> </div> </div></nav>
- Customize the
navbarto have the following:
自定义navbar如下:
- Change the label named
LinktoAbout Us.
修改名为Link的标签为About Us。 - Change the label named
DropdowntoHelp
修改名为Dropdown的标签为Help - Retain only two items in the dropdown list.
仅保留下拉列表中的两项。 - Change the label for the first dropdown item to
Technical documentation.
修改第一个下拉菜单项的标签为Technical documentation。 - Change the label for the second dropdown item to
Talk to us.
修改第二个下拉菜单项的标签为Talk to us。 - Remove or comment the
<li>tag containing the label namedDisabled.
删除或注释包含名为Disabled的标签的<li>标签。 - Change the button property for the
Searchbutton toInfo.
修改Search按钮的属性为Info。
Click here for a hint
点击此处获取提示
<button type="button" class="btn btn-info">Search</button>
Task 3: Create and customize the form for the app with Bootstrap components 任务 3:使用 Bootstrap 组件创建和自定义应用程序的表单
- Add the
formcomponent from the Bootstrap website to your code within the<body> </body>tag. You will find the code in the Overview topic of the Form section.
将 Bootstrap 网站上的form组件添加到您的代码中的<body> </body>标签内。您可以在表单部分的概述主题中找到该代码。
Here is an example code taken from the official Bootstrap site for theformcomponent, which you can use in the exercise.
这里是一个从官方 Bootstrap 网站获取的form组件示例代码,您可以在练习中使用。
<form>
  <div class="mb-3">
    <label for="exampleInputEmail1" class="form-label">Email address</label>
    <input type="email" class="form-control" id="exampleInputEmail1" aria-describedby="emailHelp">
    <div id="emailHelp" class="form-text">We'll never share your email with anyone else.</div>
  </div>
  <div class="mb-3">
    <label for="exampleInputPassword1" class="form-label">Password</label>
    <input type="password" class="form-control" id="exampleInputPassword1">
  </div>
  <div class="mb-3 form-check">
    <input type="checkbox" class="form-check-input" id="exampleCheck1">
    <label class="form-check-label" for="exampleCheck1">Check me out</label>
  </div>
  <button type="submit" class="btn btn-primary">Submit</button>
</form>
- Customize the form to have the following:
自定义表格,使其包含以下内容:
- Add a new label with a title Full name written in bold before the Email address field using the
<label>tag.
添加一个新标签,在电子邮件地址字段之前使用<label>标签,并写上加粗的“全名”。<label for="name" class="form-label"><b>Full name</b></label> - Add a new
input typetag of typetextto enter a name. Keep the width of the text box at 500px.
添加一个新的input type标签类型text,输入名称。保持文本框宽度为 500 像素。<input type="text" class="form-control" id="name" style="width: 500px;"></p> - Make the label named Email address to appear in bold using the
<b></b>tags.
将名为“电子邮件地址”的标签使用<b></b>标签加粗显示。<label for="exampleInputEmail1" class="form-label"><b>Email address</b></label></p> - Change the width of the input box for Email address to 500px using the
styleattribute in theinput typetag.
将电子邮件地址输入框的宽度更改为 500px,使用input type标签中的style属性。 - Add
style="width: 500px;"in theinput typetag for Email Address as displayed in the code.
在input type标签中添加style="width: 500px;"以显示电子邮件地址,如代码所示。<input type="email" class="form-control" id="exampleInputEmail1" aria-describedby="emailHelp" style="width: 500px;"> - Add a label named
Reason for contacting us:similar to the code used for Full name.
添加一个名为Reason for contacting us:的标签,类似于用于全名的代码。 - Add a dropdown Bootstrap component from the official Bootstrap website. You can find the dropdown component in the Dropdown topic of the Components section. For this example, we will use the code available for
split danger button.
从官方 Bootstrap 网站添加下拉 Bootstrap 组件。您可以在组件部分的下拉主题中找到下拉组件。在这个例子中,我们将使用split danger button可用的代码。
This code will add the dropdown button below the Reason for contacting us: label.<div class="dropdown"> <button class="btn btn-secondary dropdown-toggle" type="button" data-bs-toggle="dropdown" aria-expanded="false"> Dropdown button </button><ul class="dropdown-menu"><li><a class="dropdown-item" href="#">Action</a></li><li><a class="dropdown-item" href="#">Another action</a></li><li><a class="dropdown-item" href="#">Something else here</a></li></ul> </div>
这段代码将在“联系我们原因”标签下方添加下拉按钮。 - Move the dropdown next to the label and allow the selected option to be visible at the top of the dropdown button. To do this, replace the code from
<div>to</div>for the dropdown with the following code that uses the<select>tag and<option>tag. Also, the titles for each option have been changed to options relevant to the form including Billing, Technical Support, and Complaints and Feedback.
将标签旁边的下拉菜单移动,并允许选中的选项在下拉按钮顶部可见。为此,将下拉菜单的代码从<div>替换为</div>,使用以下代码,该代码包含<select>标签和<option>标签。此外,每个选项的标题也已更改为与表格相关的选项,包括账单、技术支持和投诉与反馈。<select id="cars" class="btn btn-secondary dropdown-toggle" style="background-color: rgb(255, 255, 255);color: black; text-align: center; width: 250px;" > <option value="billing" selected style=" text-align: left;">Billing</option> <option value="techsupport" style=" text-align: left;">Technical Support</option> <option value="feedback" style=" text-align: left;">Complaints and Feedback</option></select><ul class="dropdown-menu"> <li><a class="dropdown-item" href="#">Billing</a></li> <li><a class="dropdown-item" href="#">Technical Support</a></li> <li><a class="dropdown-item" href="#">Complaints and Feedback</a></li></ul> - To enable a user to add their comments, provide them with a text area. You can add the following code after the dropdown code and before the code for the
Submitbutton.
为了使用户能够添加评论,请为他们提供一个文本区域。您可以在下拉代码之后和Submit按钮代码之前添加以下代码。<div class="mb-3"> <textarea name="message" id="message" cols="65" rows="10" style="resize: none;"></textarea> </div></p> - Add a button to RESET the form using the
button type="reset"tag from the official Bootstrap website.
添加一个按钮,使用来自官方 Bootstrap 网站的button type="reset"标签重置表单。<button type="reset" class="btn btn-secondary">RESET</button>
- Make sure to save the file.
确保保存文件。
Task 4: Test the app 任务 4:测试应用
- Launch the
customer_form.htmlfile. 启动customer_form.html文件。 - A form should display with all the fields and buttons. You should also be able to add details to the form.
表單應該顯示所有字段和按鈕。您還應該能夠向表單添加詳細信息。 - Notice that the fields are too close to the left margin. You can append the
styleattribute to the<div class="mb-3">tag asstyle="margin: 30px;".
请注意字段与左侧边距太近。您可以将style属性附加到<div class="mb-3">标签上作为style="margin: 30px;"。 - After updating and saving the file, you should see a margin to the left of the labels and input boxes.
在更新并保存文件后,您应该在标签和输入框的左侧看到一个边距。