Module 01 · Git and GitHub FundamentalsGit 与 GitHub 基础
Lab: Branching and Merging (Web UI)实验:分支与合并(Web UI)
Estimated time: 15 minutes
预计时间:15 分钟
Objectives 目标
After completing this lab, you will be able to:
完成这个实验室后,您将能够:
- Create a branch 创建一个分支
- Commit changes to a child branch
提交子分支的更改 - Open a pull request 打开拉取请求
- Merge a pull request into the main branch
合并拉取请求到主分支
Prerequisites 先决条件
This hands-on lab requires you to have created a GitHub account with a repository in it, as covered in Getting started with GitHub lab.
这个动手实验室要求您在 GitHub 上创建一个包含仓库的账户,如《GitHub 入门实验室》中所述。
NOTE: In the past the default branch in your GitHub repo used the name
master. Effective Oct 1, 2020, all new GitHub repositories will use the more inclusive termmainas the name of the default branch instead ofmaster.
注意:过去在您的 GitHub 仓库中,默认分支的名称为master。自 2020 年 10 月 1 日起,所有新的 GitHub 仓库将使用更具包容性的术语main作为默认分支的名称,而不是master。
1. Create a branch 1. 创建分支
You can create or delete branches using your repository's GitHub web page. To add a branch to your repository, complete the following steps:
您可以使用 GitHub 网页创建或删除分支。要将分支添加到您的仓库中,请完成以下步骤:
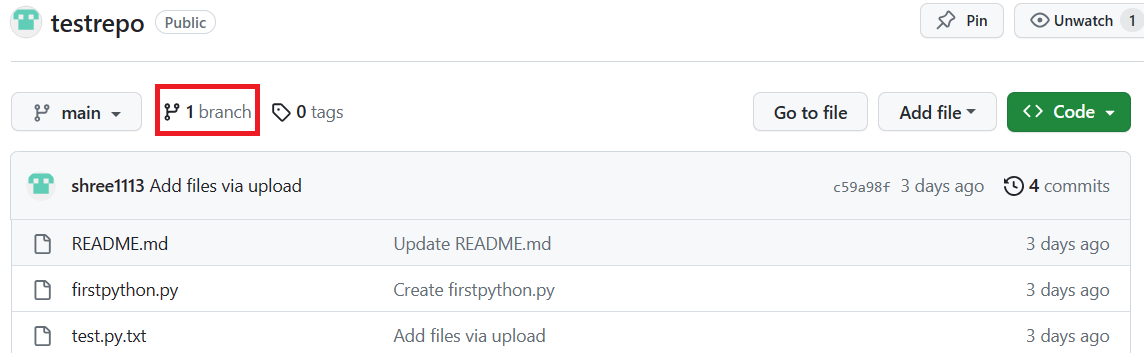
- Go to your repository's main page. Note that when you created your repository, the one branch named main was created for you.
前往您的仓库主页。注意,当您创建仓库时,为您创建了一个名为 main 的分支。
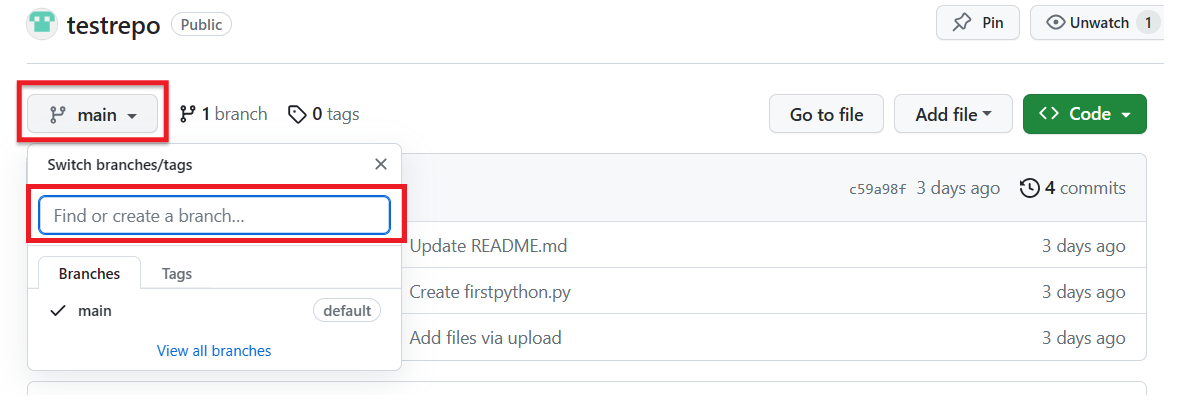
- At the top of the file list, locate the Branch drop-down menu. (By default, the menu displays Branch: main.) Click the drop-down menu, type the name of the branch you want to create, and press
Enterorreturnon your keyboard.
在文件列表顶部,找到分支下拉菜单。(默认情况下,菜单显示分支:main。)点击下拉菜单,输入您想要创建的分支名称,然后按键盘上的Enter或return。
Your repository now has two branches: Main and Child_Branch. You can click the drop-down menu to see your branches.
您的仓库现在有两个分支:主分支和子分支。您可以通过点击下拉菜单查看您的分支。
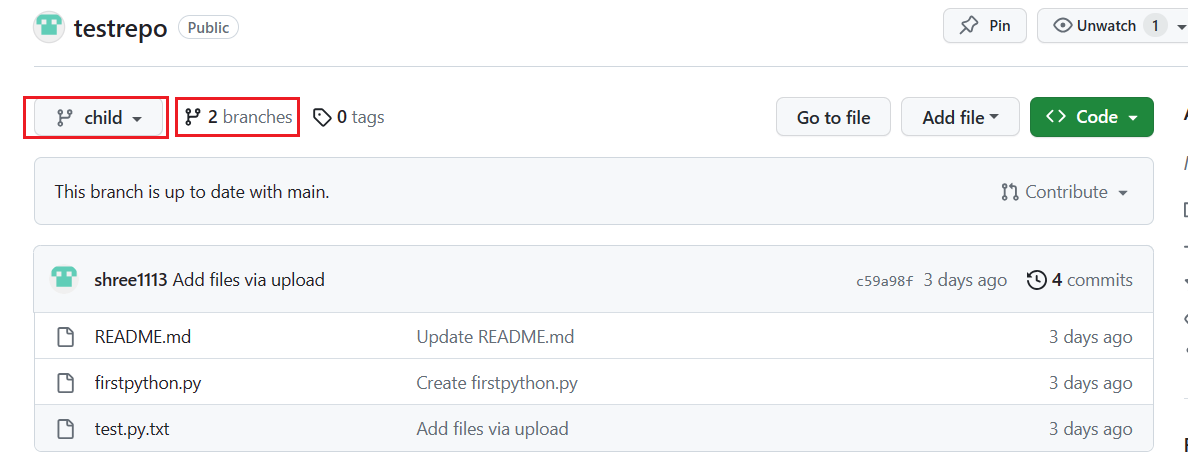
Any files that were in the main branch are reflected in the Child_Branch. Note that when you add or edit a file in Child_Branch, that change will not automatically reflect in the main branch
任何在主分支中的文件都会反映在 Child_Branch 中。请注意,当你在 Child_Branch 中添加或编辑文件时,该更改不会自动反映在主分支中
2. Add a file to a branch 2. 将文件添加到分支
To add a file to your new branch, ensure that the name you gave the new branch (which in the case of the example showcased is Child_Branch) is displayed in the Branch drop-down menu and complete the following steps:
要将文件添加到您的分支中,请确保您为新分支指定的名称(在本例中为 Child_Branch)显示在“分支”下拉菜单中,并完成以下步骤:
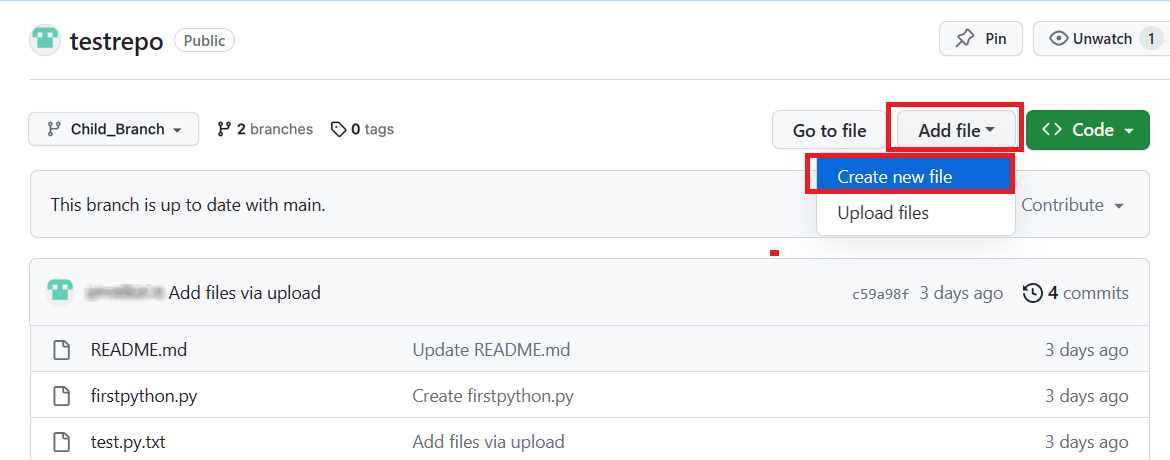
- Click Add file > Create new file to create a file in the repository.
点击添加文件 > 创建新文件以在存储库中创建文件。
- Type a name and extension for the file, for example,
testchild.py, and add the following lines to the body of the new file:
输入文件名和扩展名,例如,testchild.py,并将以下行添加到新文件的正文部分:
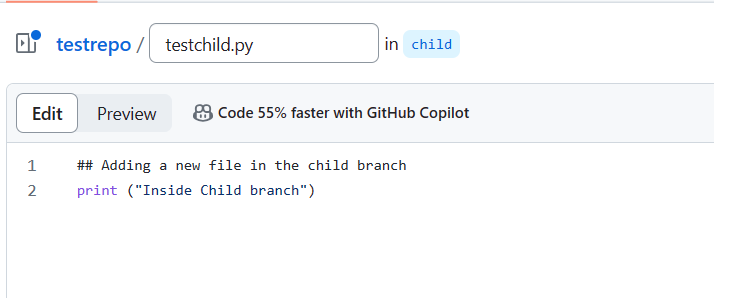
- Scroll to the bottom of the page, add a description of the file you are about to add (note that the description is optional), and click Commit.
滚动到页面底部,添加您即将添加的文件的描述(注意,描述是可选的),然后点击提交。
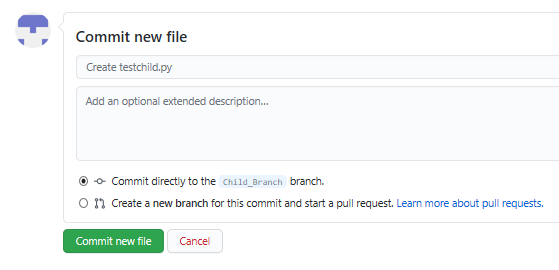
The file is added to your child branch.
文件已添加到您的子分支中。
3. Open a pull request 3. 打开一个拉取请求
The file that you added to your child branch is not automatically added to the main branch. (You can check this by using the Branch drop-down menu to go to the main branch; note that there is no testchild.py file in the file list).
您添加到子分支的文件不会自动添加到主分支。(您可以通过使用分支下拉菜单切换到主分支来检查这一点;请注意,文件列表中没有 testchild.py 文件)。
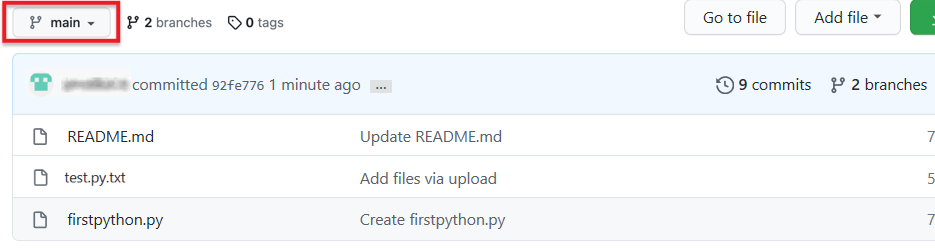
You can also compare the two branches and open a pull request, which will enable you to merge the changes that you've made in the child branch – in this case, adding a new file – to the main branch.
您还可以比较这两个分支并提交一个拉取请求,这将使您能够将您在子分支中做出的更改(在本例中是添加一个新文件)合并到主分支中。
- In Child_Branch, click the Compare & pull request button.
在 Child_Branch 中,点击比较和拉取请求按钮。

- Scroll to the bottom of the page and note that there is 1 changed file listed and the changes are highlighted in green.
滚动到页面底部,注意有 1 个文件被修改,更改内容以绿色突出显示。

- Scroll up and note that GitHub is comparing the main and Child_Branch branches and that there are no conflicts between the two. Optionally, you can add a comment to the pull request. Click Create pull request.
向上滚动并注意 GitHub 正在比较主分支和 Child_Branch 分支,并且这两个分支之间没有冲突。可选地,您可以在拉取请求中添加注释。点击创建拉取请求。
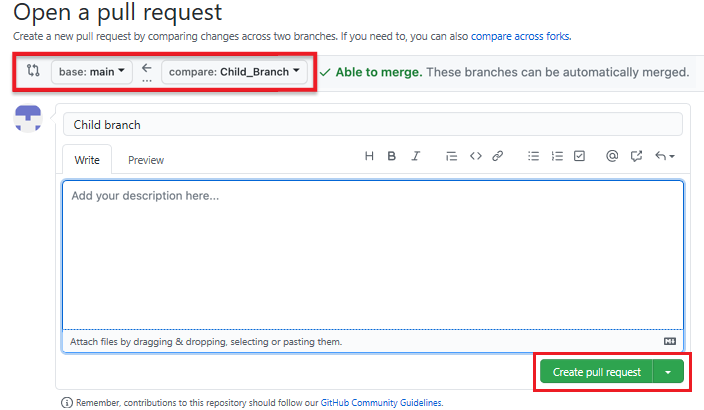
The pull request has been successfully created and is now ready to be merged by a repository administrator. For all the repositories that you create, you automatically have administrative rights.
拉取请求已成功创建,现在可供存储库管理员合并。对于您创建的所有存储库,您自动拥有管理权限。
4. Merge a pull request 4. 合并拉取请求
To merge a pull request into a project, complete the following steps:
将拉取请求合并到项目中,请完成以下步骤:
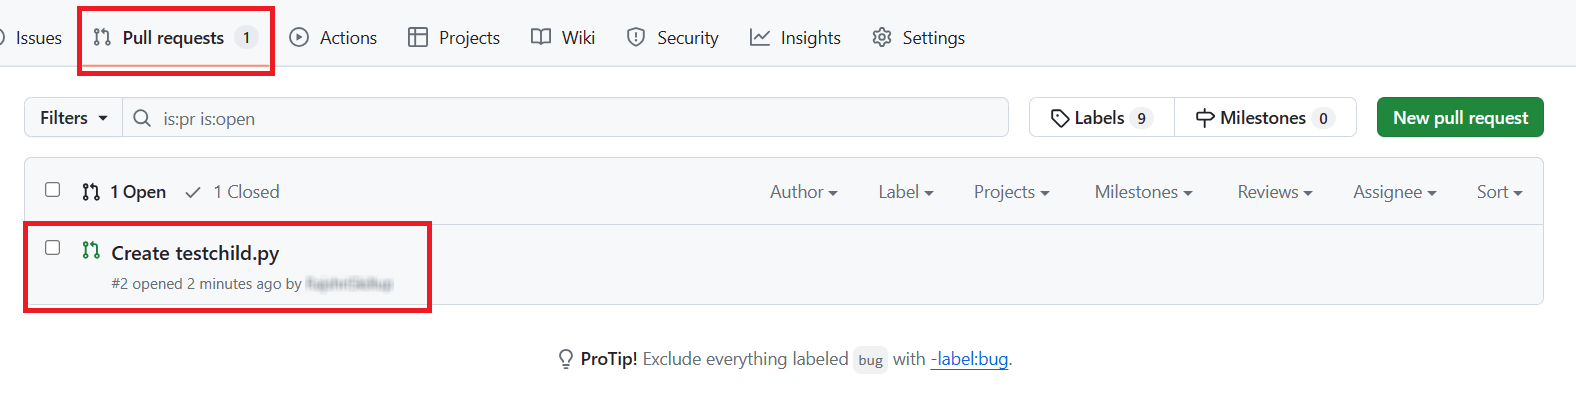
- Click the Pull requests tab. A list of pending pull requests is displayed.
点击“拉取请求”标签。显示待处理的拉取请求列表。
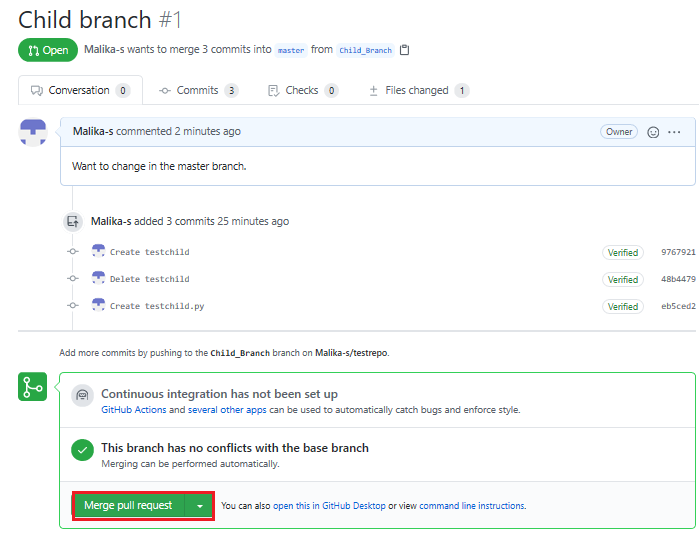
- Click the pull request that you want to merge into the main project. Review the changes, click Merge pull request to accept the pull request and merge the updates. (You can optionally add a comment.)
点击您想要合并到主项目的拉取请求。审查更改,点击合并拉取请求以接受拉取请求并合并更新。(您可以可选地添加评论。)
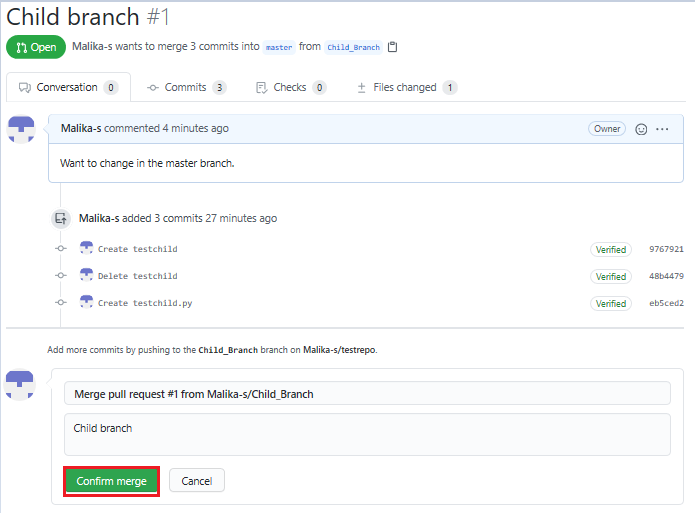
- When you click Merge pull request, a Confirm merge button is displayed. Click that button to complete the merge.
当你点击合并拉取请求时,会显示一个确认合并按钮。点击该按钮以完成合并。
The pull request has now been merged successfully. Note that you can delete the child branch because your changes have been incorporated into the main branch.
已成功合并拉取请求。请注意,您现在可以删除子分支,因为您的更改已被合并到主分支中。

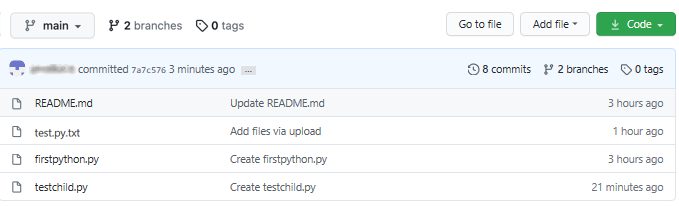
Check the list of files in the main branch to confirm that it now includes the file that you added in the pull request.
检查主分支中的文件列表,以确认它现在包括你在拉取请求中添加的文件。
Summary 摘要
Congratulations! You've now learned how to create a branch, edit and commit changes in that branch, open a pull request, and merge the pull request into your main project. We encourage you to continue to experiment with branches and pull requests to become more familiar with the concepts and processes.
恭喜!你现在已经学会了如何创建分支、编辑并提交该分支中的更改、发起拉取请求,以及将拉取请求合并到主项目中。我们鼓励你继续在分支和拉取请求上进行实验,以便更加熟悉这些概念和流程。
Author details 作者详情
Author: 作者:
- Malika Singla 马丽卡·辛格拉
Other contributor: 其他贡献者:
- Rav Ahuja 拉夫·阿胡贾