Module 03 · Creating AI Application and Deploy using Flask
Practice Project: Sentiment Analysis练习项目:情感分析
In this project, you have the opportunity to develop a Python web app using Flask and integrate Embeddable Watson AI libraries to make the web app showcase AI-based abilities.
在这个项目中,你有机会使用 Flask 开发一个 Python 网络应用程序,并集成可嵌入的 Watson AI 库,使网络应用程序展示基于人工智能的功能。
AI-based Web Application development and deployment 基于 AI 的 Web 应用开发与部署

Estimated Time: 60 minutes
预计时间:60 分钟
Overview 概述
In this project, we make use of the embedded Watson AI libraries, to create an application that would perform sentiment analysis on a provided text. We then deploy the said application over the web using Flask framework.
在本项目中,我们利用嵌入式 Watson AI 库,创建一个可以对提供的文本进行情感分析的应用程序。然后,我们使用 Flask 框架将此应用程序部署到 Web 上。
Project guidelines 项目指南
For the completion of this project, you'll have to complete the following 8 tasks, based on the knowledge you have gained through the course.
为完成此项目,您需要根据课程所学知识完成以下 8 项任务。
Tasks and objectives: 任务与目标
- Task 1: Clone the project repository
任务 1:克隆项目仓库 - Task 2: Create a sentiment analysis application using Watson NLP library
任务 2:使用Watson NLP库创建一个情感分析应用程序 - Task 3: Format the output of the application
任务 3:格式化应用程序的输出 - Task 4: Package the application
任务 4:打包应用程序 - Task 5: Run Unit tests on your application
任务 5:在您的应用程序上运行单元测试 - Task 6: Deploy as web application using Flask
任务 6:使用Flask 部署为 Web 应用程序 - Task 7: Incorporate Error handling
任务 7:加入错误处理 - Task 8: Run static code analysis
任务 8:运行静态代码分析
Let's get started !
让我们开始吧!
About Embeddable Watson AI libraries 关于嵌入式 Watson AI 库
In this project, you'll be using embeddable libraries to create an AI powered Python application.
在这个项目中,你将使用嵌入式库来创建一个由人工智能驱动的 Python 应用程序。
Embeddable Watson AI libraries include the NLP library, the text-to-speech library and the speech-to-text library. These libraries can be embedded and distributed as part of your application. For your convenience, these libraries have been pre-installed on Skills Network Labs Cloud IDE for use in this project.
可嵌入的 Watson AI 库包括 NLP 库、文本转语音库和语音转文本库。这些库可以嵌入并作为您应用程序的一部分进行分发。为了方便起见,这些库已预装在 Skills Network Labs Cloud IDE 中,供此项目使用。
The NLP library includes functions for sentiment analysis, emotion detection, text classification, language detection, etc. among others. The speech-to-text library contains functions that perform the transcription service and generates written text from spoken audio. The text-to-speech library generates natural sounding audio from written text. All available functions, in each of these libraries, calls pretrained AI models that are all available on the Cloud IDE servers, available to all users for free.
NLP 库包括情感分析、情绪检测、文本分类、语言检测等功能。语音转文本库包含执行转录服务并将语音转换为书面文本的函数。文本转语音库根据书面文本生成自然语音。这些库中的所有可用函数都调用预训练的 AI 模型,这些模型在 Cloud IDE 服务器上均可用,所有用户均可免费使用。
These libraries may also be accessed through your personal systems. The guidelines for the same are available on the Watson AI library page.
这些库也可以通过您的个人系统进行访问。相关指南可在 Watson AIP 库页面找到。
Task 1: Clone the project repository 任务 1:克隆项目代码库
The Github repository of the project is available on the URL mentioned below.
该项目的 Github 仓库可在下文提到的URL上获取。
https://github.com/ibm-developer-skills-network/zzrjt-practice-project-emb-ai.git
-
Open a new Terminal and make the directory
practice_projectusingmkdircommand and change the current directorypractice_projectusingcdcommand
打开一个新的终端,使用practice_project命令创建目录mkdir,并使用practice_project命令更改当前目录cd。mkdir practice_projectcd practice_project
-
Clone this GitHub repo, using the Cloud IDE terminal to your project to a folder named
practice_project.
使用 Cloud IDE 终端将此 GitHub 仓库克隆到名为practice_project的文件夹中。
Click here for hint
点击此处获取提示git clone <Paste_URL_here> folder
git clone <在此处粘贴 URL> 文件夹Click here for solution
点击此处查看解决方案
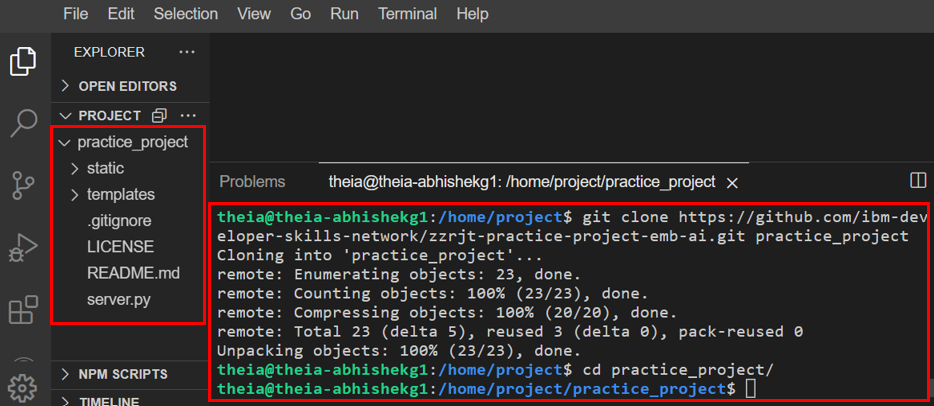
git clone https://github.com/ibm-developer-skills-network/zzrjt-practice-project-emb-ai.git practice_project
cd practice_project
- Ensure Python 3.11 and required libraries are available:
确保 Python 3.11 和所需库可用:python3.11 -Vpip3.11 show requests flask pylint
- Install missing libraries:
安装缺失的库:python3.11 -m pip install requests flask pylint
- Upon completion, the project tab should have the folder structure as shown in the image.
完成后,项目选项卡应具有如图所示的文件夹结构。
Task 2: Create a sentiment analysis application using Watson NLP library 任务 2:使用Watson NLP库创建一个情感分析应用程序
NLP sentiment analysis is the practice of using computers to recognize sentiment or emotion expressed in a text. Through NLP, sentiment analysis categorizes words as positive, negative or neutral.
NLP 情感分析是指利用计算机识别文本中表达的情感或情绪。通过NLP,情感分析将词语分类为正面、负面或中性。
Sentiment analysis is often performed on textual data to help businesses monitor brand and product sentiment in customer feedback, and understanding customer needs. It helps attain the attitude and mood of the wider public which can then help gather insightful information about the context.
情感分析通常在文本数据上执行,以帮助企业监控客户反馈中的品牌和产品情感,以及理解客户需求。它有助于获取更广泛公众的态度和情绪,从而帮助收集有关背景的深刻信息。
For creating the sentiment analysis application, we'll be making use of the Watson Embedded AI Libraries. Since the functions of these libraries are already deployed on the Cloud IDE server, there is no need of importing these libraries to our code. Instead, we need to send a POST request to the relevant model with the required text and the model will send the appropriate response.
为了创建情感分析应用程序,我们将使用Watson嵌入式AI库。由于这些库的功能已经部署在Cloud IDE服务器上,因此无需将这些库导入我们的代码。相反,我们需要向相关模型发送 POST 请求,并提供所需的文本,模型将返回相应的响应。
A sample code for such an application could be
此类应用程序的一个示例代码可以是
import requests

def <function_name>(<input_args>):
    url = '<relevant_url>'
    headers = {<header_dictionary>}
    myobj = {<input_dictionary_to_the_function>}
    response = requests.post(url, json = myobj, headers=header)
    return response.text
Note: The response of the Watson NLP functions is in the form of an object. For accessing the details of the response, we can use text attribute of the object by calling response.text and make the function return the response as simple text.
注意:Watson NLP函数的响应以对象的形式返回。为了访问响应的详细信息,我们可以通过调用 response.text 并使函数返回简单文本来使用对象的 text 属性。
For this project, you'll be using the BERT based Sentiment Analysis function of the Watson NLP Library. For accessing this function, the URL, the headers and the input json format is as follows.
在这个项目中,您将使用Watson NLP Library的基于 BERT 的情感分析功能。为了访问此功能,URL、头部和输入json格式如下。
URL: 'https://sn-watson-sentiment-bert.labs.skills.network/v1/watson.runtime.nlp.v1/NlpService/SentimentPredict'Headers: {"grpc-metadata-mm-model-id": "sentiment_aggregated-bert-workflow_lang_multi_stock"}Input json: { "raw_document": { "text": text_to_analyse } }
Here, text_to_analyze is being used as a variable that holds the actual written text which is to be analyzed.
这里, text_to_analyze 被用作一个变量,它包含要分析的文本。
In this task, you need to create a new file named sentiment_analysis.py in practice_project folder. In this file, write the function for running sentiment analysis using the Watson NLP BERT Sentiment Analysis function, as discussed above. Let us call this function sentiment_analyzer. Assume that that text to be analysed is passed to the function as an argument and is stored in the variable text_to_analyse.
在这个任务中,您需要在 practice_project 文件夹中创建一个名为 sentiment_analysis.py 的新文件。在这个文件中,编写一个用于运行情感分析的函数,使用上面讨论的Watson NLP BERT情感分析函数。我们将这个函数命名为 sentiment_analyzer 。假设要分析的文本作为参数传递给该函数,并存储在变量 text_to_analyse 中。
Click here for the solution
点击此处获取答案
sentiment_analysis.py
import requests  # Import the requests library to handle HTTP requests

def sentiment_analyzer(text_to_analyse):  # Define a function named sentiment_analyzer that takes a string input (text_to_analyse)
    url = 'https://sn-watson-sentiment-bert.labs.skills.network/v1/watson.runtime.nlp.v1/NlpService/SentimentPredict'  # URL of the sentiment analysis service
    myobj = { "raw_document": { "text": text_to_analyse } }  # Create a dictionary with the text to be analyzed
    header = {"grpc-metadata-mm-model-id": "sentiment_aggregated-bert-workflow_lang_multi_stock"}  # Set the headers required for the API request
    response = requests.post(url, json = myobj, headers=header)  # Send a POST request to the API with the text and headers
    return response.text  # Return the response text from the API
This application can now be called using Python shell. To test the application, open a Python shell using python3.11 to open the python shell on the current directory i.e practice_project. Make sure that the current directory is practice_project.
现在可以使用 Python shell 调用此应用程序。要测试应用程序,请使用 python3.11 在当前目录(即 practice_project)打开 Python shell。确保当前目录为 practice_project 。
python3.11
In the python shell, import the function sentiment_analyzer.
在python shell中导入 sentiment_analyzer 函数。
Click here for hint
点击此处获取提示
Syntax: 语法:
from file_name import function_name
Click here for solution
点击此处查看解决方案
from sentiment_analysis import sentiment_analyzer
After successful import, test your application with the text “I love this new technology.”
导入成功后,使用文本“我喜欢这项新技术。”测试您的应用程序。
sentiment_analyzer("I love this new technology")
The result expected is as shown in the image below. To exit the python shell, press Ctrl+Z or type exit().
预期的结果如下所示图像。要退出python shell,按 Ctrl+Z 或输入 exit() 。

This completes the Task 2. Note that in the output, the information relevant to us is only the label and the score. In the following task, you will extract this information from this output.
这完成了任务 2。请注意,在输出中,与我们相关的是 label 和 score 。在下一个任务中,您将从此输出中提取这些信息。
Task 3: Format the output of the application 任务 3:格式化应用程序的输出
The output of the application created is in the form of a dictionary, but has been formatted as a text. To access relevant pieces of information from this output, we need to first convert this text into a dictionary. Since dictionaries are the default formatting system for JSON files, we make use of the in-built Python library json.
应用程序创建的输出以字典形式存在,但已被格式化为文本。要从此输出中访问相关信息,我们需要首先将此文本转换为字典。由于字典是JSON文件的默认格式系统,我们使用内置的 Python 库 json 。
Let's see how this works.
让我们看看它是如何工作的。
First, in a Python shell, import the json library.
首先,在 Python shell 中,导入json库。
import json
Next, run the sentiment_analyzer function for the text “I love this new technology”, just like in Task 2, and store the output in a variable called response.
接下来,运行文本“I love this new technology”的情感分析器函数,就像在任务 2 中一样,并将输出存储在一个名为 response 的变量中。
from sentiment_analysis import sentiment_analyzerresponse = sentiment_analyzer("I love this new technology")
Now, pass the response variable as an argument to the json.loads function and save the output in formatted_response. Print formatted_response to see the difference in the formatting.
现在,将 response 变量作为参数传递给json.loads 函数,并将输出保存到 formatted_response 。打印 formatted_response 以查看格式差异。
formatted_response = json.loads(response)print(formatted_response)
The expected output of the above mentioned steps is shown in the image below.
上述步骤的预期输出显示在下面的图片中。
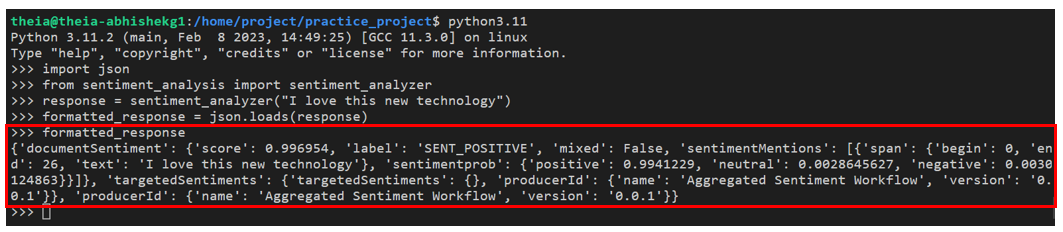
Note that the absence of single quotes on either side of the response indicates that this is no longer a text, but is a dictionary instead. To access the correct information from this dictionary, we need to access the keys appropriately. Since this is a nested dictionary structure, i.e. a dictionary of dictionaries, the following statements need to be used to get the label and the score outputs from this response.
请注意,响应的两侧没有单引号,这表明它不再是一个文本,而是一个字典。为了从该字典中获取正确的信息,我们需要适当地访问键。由于这是一个嵌套字典结构,即字典的字典,需要使用以下语句从该响应中获取标签和分数输出。
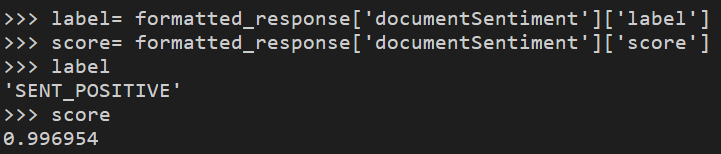
label = formatted_response['documentSentiment']['label']score = formatted_response['documentSentiment']['score']
Check the contents of label and score to verify the output.
检查 label 和 score 的内容以验证输出。
Now, for Task 3, incorporate the above mentioned technique and make changes to the sentiment_analysis.py file. The expected output from calling the sentiment_analyzer function should now be a dictionary with 2 keys, label and score, each having the appropriate value extracted from the response of the Watson NLP function. Verify your changes by testing the modified function in a python shell.
现在,对于任务 3,结合上述技术对 sentiment_analysis.py 文件进行修改。调用 sentiment_analyzer 函数的预期输出现在应为一个包含两个键(label 和 score)的字典,每个键都具有从Watson NLP 函数响应中提取的适当值。通过在python shell 中测试修改后的函数来验证您的更改。
Click here for the solution
点击此处获取答案
import requests
import json

def sentiment_analyzer(text_to_analyse):
    # URL of the sentiment analysis service
    url = 'https://sn-watson-sentiment-bert.labs.skills.network/v1/watson.runtime.nlp.v1/NlpService/SentimentPredict'

    # Constructing the request payload in the expected format
    myobj = { "raw_document": { "text": text_to_analyse } }

    # Custom header specifying the model ID for the sentiment analysis service
    header = {"grpc-metadata-mm-model-id": "sentiment_aggregated-bert-workflow_lang_multi_stock"}

    # Sending a POST request to the sentiment analysis API
    response = requests.post(url, json=myobj, headers=header)

    # Parsing the JSON response from the API
    formatted_response = json.loads(response.text)

    # Extracting sentiment label and score from the response
    label = formatted_response['documentSentiment']['label']
    score = formatted_response['documentSentiment']['score']

    # Returning a dictionary containing sentiment analysis results
    return {'label': label, 'score': score}
At completion, the expected output of the function is shown in the image below.
完成时,函数的预期输出如图所示。

To exit the python shell, type exit() or press Ctrl+Z.
要退出 python shell,请输入 exit() 或按 Ctrl+Z 。
Task 4: Package the application 任务 4:打包应用程序
In this task, you have to package the final application you created in tasks 2 and 3
在此任务中,您需要将任务 2 和任务 3 中创建的最终应用程序进行打包
Let's keep the name of the package as SentimentAnalysis. The steps involved in packaging are:
让我们将包的名称保持为 SentimentAnalysis 。打包过程中涉及的步骤如下:
- Create a folder in the working directory, with the name as the package name.
在工作目录中创建一个文件夹,其名称为包名。
Click here for hint
点击此处获取提示
mkdir <package_name>
Click here for solution
点击此处查看解决方案
mkdir SentimentAnalysis
- Move the application code (i.e., the module) into the package folder.
将应用程序代码(即模块)移动到包文件夹中。
Click here for hint
点击此处获取提示
You may use a terminal command or the Cloud IDE console to move the sentiment_analysis.py file to the SentimentAnalysis folder
您可以使用终端命令或云 IDE 控制台将sentiment_analysis.py文件移动到SentimentAnalysis文件夹
Click here for solution
点击此处查看解决方案
mv ./sentiment_analysis.py ./SentimentAnalysis
- Create the new file as init.py file, inside the package folder to reference the module.
在包文件夹中创建一个新的文件作为 init.py 文件,以引用该模块。
Click here for hint
点击此处获取提示
Import the module/function from the current folder in the init file
在初始化文件中从当前文件夹导入模块/函数
Click here for solution
点击此处查看解决方案
Insert this following line to init.py
在 init.py 中插入以下行。
from . import sentiment_analysis
The final folder structure should look as shown in the image below.
最终的文件夹结构应如图所示。
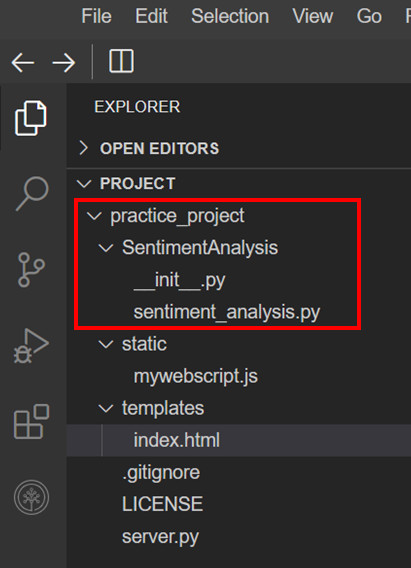
SentimentAnalysis is now a valid package and can be imported into any file in this project.
SentimentAnalysis 现在是一个有效的包,可以导入到此项目的任何文件中。
To test this, run a python shell in the terminal and try importing the sentiment_analyzer function from the package.
要测试此功能,请在终端中运行 Python Shell,并尝试从包中导入 sentiment_analyzer 函数。
Click here for the hint
点击此处获取提示
The syntax for this import is
此导入的语法为
from package_name.module_name import function_name
Click here for the solution
点击此处获取答案
from SentimentAnalysis.sentiment_analysis import sentiment_analyzer
No error message received after import statement would indicate that the package is now ready for usage. Test the function by running the following statement in the shell.
导入语句后未收到错误消息,则表明该软件包现已准备就绪。在shell中运行以下语句以测试该功能。
sentiment_analyzer("This is fun.")
The output received would look as shown below.
收到的输出将如下所示。

To exit the python shell, type exit() or press Ctrl+Z.
要退出python shell,请输入 exit() 或按 Ctrl+Z 。
Task 5: Run Unit tests on your application 任务 5:对你的应用程序运行单元测试
Since now we have a functional application, it is required that we run unit tests on some test cases to check the validity of its outputs.
由于现在我们有一个功能性的应用程序,因此要求我们在一些测试用例上运行单元测试,以检查其输出的有效性。
For running unit tests, we need to create a new file that calls the required application function from the package and tests its for a known text and output pair.
为了运行单元测试,我们需要创建一个新文件,从包中调用所需的应用程序函数,并测试其对于已知的文本和输出对。
For this, complete the following steps.
为此,请完成以下步骤。
- Create a new file in
practice_projectfolder, calledtest_sentiment_analysis.py.
在practice_project文件夹中创建一个新文件,名为test_sentiment_analysis.py。 - In this file, import the
sentiment_analyzerfunction from theSentimentAnalysispackage. Also import theunittestlibrary.
在此文件中,从SentimentAnalysis包中导入sentiment_analyzer函数。同时导入unittest库。
Click here for the solution
点击此处获取答案
from SentimentAnalysis.sentiment_analysis import sentiment_analyzer
import unittest
- Create the unit test class. Let's call it TestSentimentAnalyzer. Define
test_sentiment_analyzeras the function to run the unit tests.
创建单元测试类。我们将其称为TestSentimentAnalyzer. 定义test_sentiment_analyzer为运行单元测试的函数。
Click here for the solution
点击此处获取答案
class TestSentimentAnalyzer(unittest.TestCase):
    def test_sentiment_analyzer(self):
- Define 3 unit tests in the said function and check for the validity of the following statement - label pairs.
在该函数中定义 3 个单元测试,并检查以下标签对的有效性。
“I love working with Python”: “SENT_POSITIVE”
“我喜欢使用 Python”: “SENT_POSITIVE”
“I hate working with Python”: “SENT_NEGATIVE”
“我讨厌使用 Python”: “SENT_NEGATIVE”
“I am neutral on Python”: “SENT_NEUTRAL”
“我对 Python 持中立态度”: “SENT_NEUTRAL”
Click here for hint
点击此处获取提示
Use assertEqual function to compare the label of the output with the label expected.
使用assertEqual函数比较输出中的label与预期标签。
Click here for solution
点击此处查看解决方案
class TestSentimentAnalyzer(unittest.TestCase):
    def test_sentiment_analyzer(self):
        # Test case for positive sentiment
        result_1 = sentiment_analyzer('I love working with Python')
        self.assertEqual(result_1['label'], 'SENT_POSITIVE')
        # Test case for negative sentiment
        result_2 = sentiment_analyzer('I hate working with Python')
        self.assertEqual(result_2['label'], 'SENT_NEGATIVE')
        # Test case for neutral sentiment
        result_3 = sentiment_analyzer('I am neutral on Python')
        self.assertEqual(result_3['label'], 'SENT_NEUTRAL')
- Call the unit tests. 调用单元测试。
Click here for solution
点击此处查看解决方案
Add the following line at the end of the file.
在文件末尾添加以下行。
unittest.main()
Now that the file is ready, execute the file to perform unit tests. Upon successful execution, the output of this file should be as shown in the image below.
文件已准备好,执行文件以进行单元测试。成功执行后,该文件的输出应如下所示。

Task 6: Deploy as web application using Flask 任务 6:使用 Flask 部署为 Web 应用程序
Now that the application is ready, it is time to deploy it for usage over a web interface. To ease the process of deployment, you have been provided with 3 files which are going to be used for this task.
现在应用程序已准备就绪,是时候通过 Web 界面进行部署了。为了简化部署过程,您已获得 3 个文件,这些文件将用于此任务。
- Verify directory structure:
验证目录结构:
practice_project/
├── SentimentAnalysis/
│   ├── __init__.py
│   ├── sentiment_analysis.py
├── templates/
│   ├── index.html
├── static/
│   ├── mywebscript.js
├── server.py
- This
index.htmlintemplatesfolder file has the code for the web interface that has been designed for this lab. This is being provided for you in completion and is to be used as is. You are not required to make any changes to this file.
在templates文件夹中的index.html文件包含了为本次实验设计的网页界面的代码。该代码已完整提供,可直接使用,无需进行任何修改。
The interface is as shown in the image.
界面如图所示。
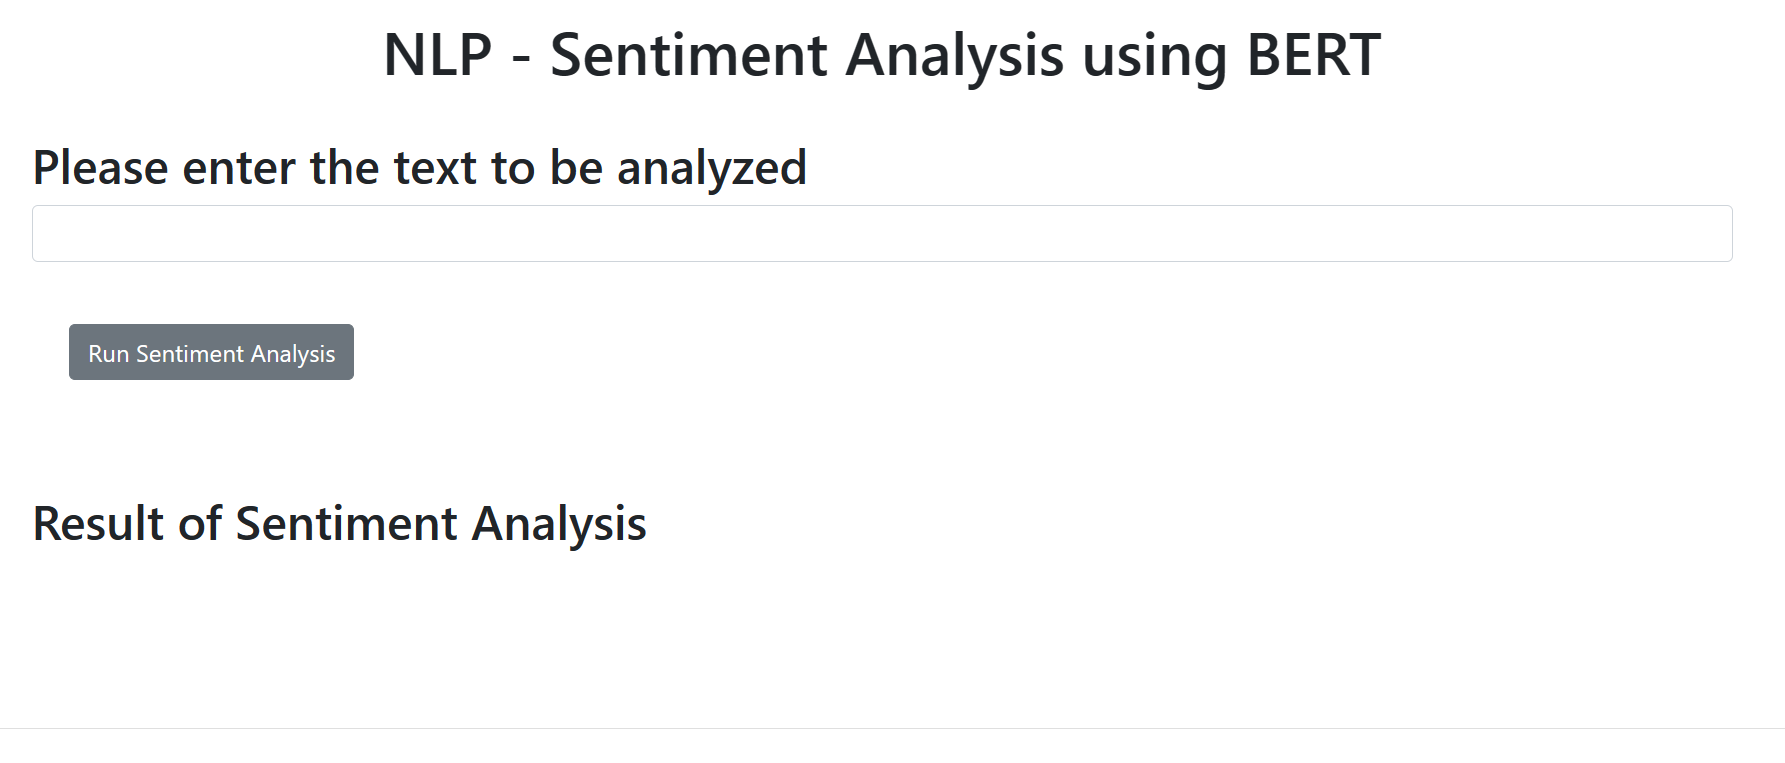
- On clicking the
Run Sentiment Analysisbutton, on the html interface, calls this mywebscript.js javascript file instaticfolder which executes a GET request and takes the text provided by the user as input. This text, saved in a variable namedtextToAnalyzeis then passed on to the server file to be sent to the application. This file is also being provided to you in completion and is expected to be used as is. You are not required to make any changes to this file.
点击Run Sentiment Analysis按钮时,在 HTML 界面中,调用位于static文件夹中的 mywebscript.js JavaScript 文件,该文件执行 GET 请求并使用用户提供文本作为输入。此文本保存在名为textToAnalyze的变量中,然后传递给服务器文件以发送到应用程序。此文件也已提供完整版,预计可直接使用。您无需对此文件进行任何修改。 - Open
server.pyin thepractice_projectfolder.This task revolves around the completion of this file. You can complete this file by completing the following 5 steps.
在practice_project文件夹中打开server.py。这项任务围绕着完成这个文件。你可以通过完成以下 5 个步骤来完成这个文件。
a. Import the relevant libraries and functions
a. 导入相关的库和函数
In this file, you'll need the Flask library along with its render_template function (for deploying the HTML file) and request function (to initiate the GET request from the web page).
在这个文件中,您需要使用 Flask 库,包括其 render_template 函数(用于部署 HTML 文件)和 request 函数(用于从网页发起 GET 请求)。
You also would need to import the sentiment_analyzer function from the SentimentAnalysis package.
您还需要从 SentimentAnalysis 包中导入 sentiment_analyzer 函数。
Add the relevant lines of code, importing the said functions, in server.py
在 server.py 中添加导入所述函数的相关代码行。
Click here for solution
点击此处查看解决方案
from flask import Flask, render_template, requestfrom SentimentAnalysis.sentiment_analysis import sentiment_analyzer
b. *Initiate the Flask app by the name *Sentiment Analyzer
b. 通过名称 Sentiment Analyzer 启动 Flask 应用。
Put the knowledge gained in Module 2 of this course and add the statement to server.py, that initiates the application and names it Sentiment Analyzer.
将本课程模块 2 中获得的知识应用起来,并将启动应用程序的语句添加到 server.py 中,命名为 Sentiment Analyzer 。
Click here for solution
点击此处查看解决方案
app = Flask("Sentiment Analyzer")
c. *Define the function *sent_analyzer
c. 定义函数 sent_analyzer
The purpose of this function is two fold. First, the function should send a GET request to the HTML interface to receive the input text. Note that the GET request should reference textToAnalyze variable as defined in the mywebscript.js file. Store the incoming text to a variable text_to_analyze. Now, as the second function, call your sentiment_analyzer application with text_to_analyze as the argument.
此函数的目的是双重的。首先,该函数应向 HTML 界面发送 GET 请求以获取输入文本。请注意,GET 请求应引用在 mywebscript.js 文件中定义的 textToAnalyze 变量。将接收到的文本存储到变量 text_to_analyze 中。现在,作为第二个函数,使用 text_to_analyze 作为参数调用您的 sentiment_analyzer 应用程序。
Also, format the returning output of the function in a formal text. For e.g.
此外,请以正式文本格式化函数的返回输出。对于 e.g。
The given text has been identified as POSITIVE with a score of 0.99765.
Click here for hint
点击此处获取提示
- Use request.args.get to initiate the GET request.
使用 request.args.get 来发起 GET 请求。 - The label, received as "SENT_CLASS" (where class can be POSITIVE, NEGATIVE or NEUTRAL), will have to be split on ‘’ to access the class name individually.
标签,以“SENT_CLASS”(其中 class 可以是 POSITIVE、NEGATIVE 或 NEUTRAL)的形式接收,需要以‘’为分隔符进行拆分,以便单独访问类别名称。
Click here for solution
点击此处查看解决方案
The function should read like this.
函数应如下所示。
@app.route("/sentimentAnalyzer")
def sent_analyzer():
    # Retrieve the text to analyze from the request arguments
    text_to_analyze = request.args.get('textToAnalyze')

    # Pass the text to the sentiment_analyzer function and store the response
    response = sentiment_analyzer(text_to_analyze)

    # Extract the label and score from the response
    label = response['label']
    score = response['score']

    # Return a formatted string with the sentiment label and score
    return "The given text has been identified as {} with a score of {}.".format(label.split('_')[1], score)
Note: The function uses the Flask decorator @app.route("/sentimentAnalyzer") as referenced in the mywebscript.js file.
注意:该函数使用 Flask decorator @app.route("/sentimentAnalyzer") ,如 mywebscript.js 文件中所述。
d. *Render the HTML template using *render_index_page
d. 使用 render_index_page 渲染 HTML 模板。
This function should simply run the render_template function on the HTML template, index.html.
此函数应直接在 HTML 模板上运行 render_template 函数, index.html 。
Click here for solution
点击此处查看解决方案
@app.route("/")
def render_index_page():
    return render_template('index.html')
e. *Run the application on *localhost:5000
e. 在 localhost:5000 上运行应用程序。
Finally, upon file execution, run the application on host: 0.0.0.0 (or localhost) on port number 5000.
最后,在文件执行后,在主机 0.0.0.0 (或 localhost)上的端口编号 5000 上运行应用程序。
Click here for solution
点击此处查看解决方案
if __name__ == "__main__":
    app.run(host="0.0.0.0", port=5000)
To deploy the application, execute the file server.py from the terminal.
要部署应用程序,请从终端执行文件 server.py。
python3.11 server.py
The output would look like this.
输出将如下所示。

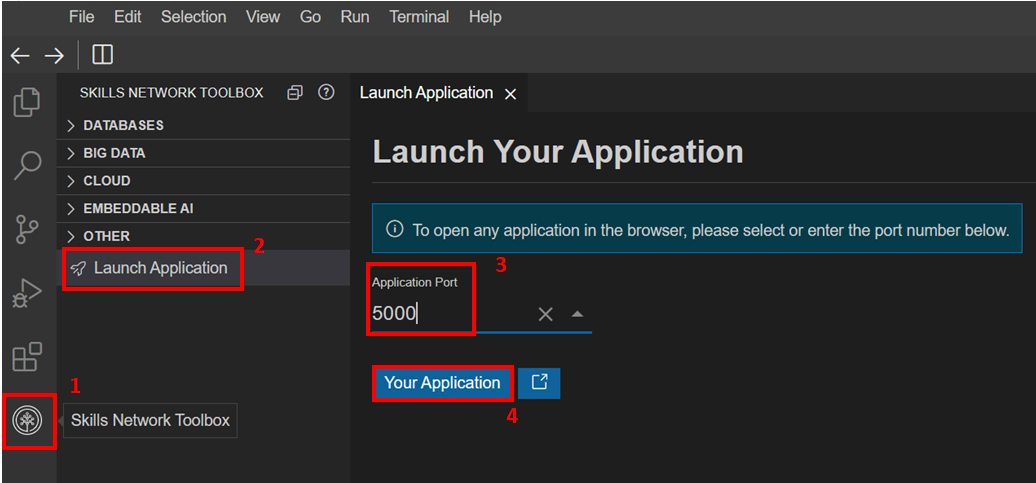
The app is now running on localhost:5000. To access the application, go to the Skills Network Toolbox tab and click on Launch Application. Enter the Application port as 5000, and click on Your Application.
应用程序现在正在 localhost:5000 上运行。要访问应用程序,请转到 Skills Network Toolbox 选项卡并点击启动应用程序。将应用程序端口设置为5000,然后点击您的应用程序。
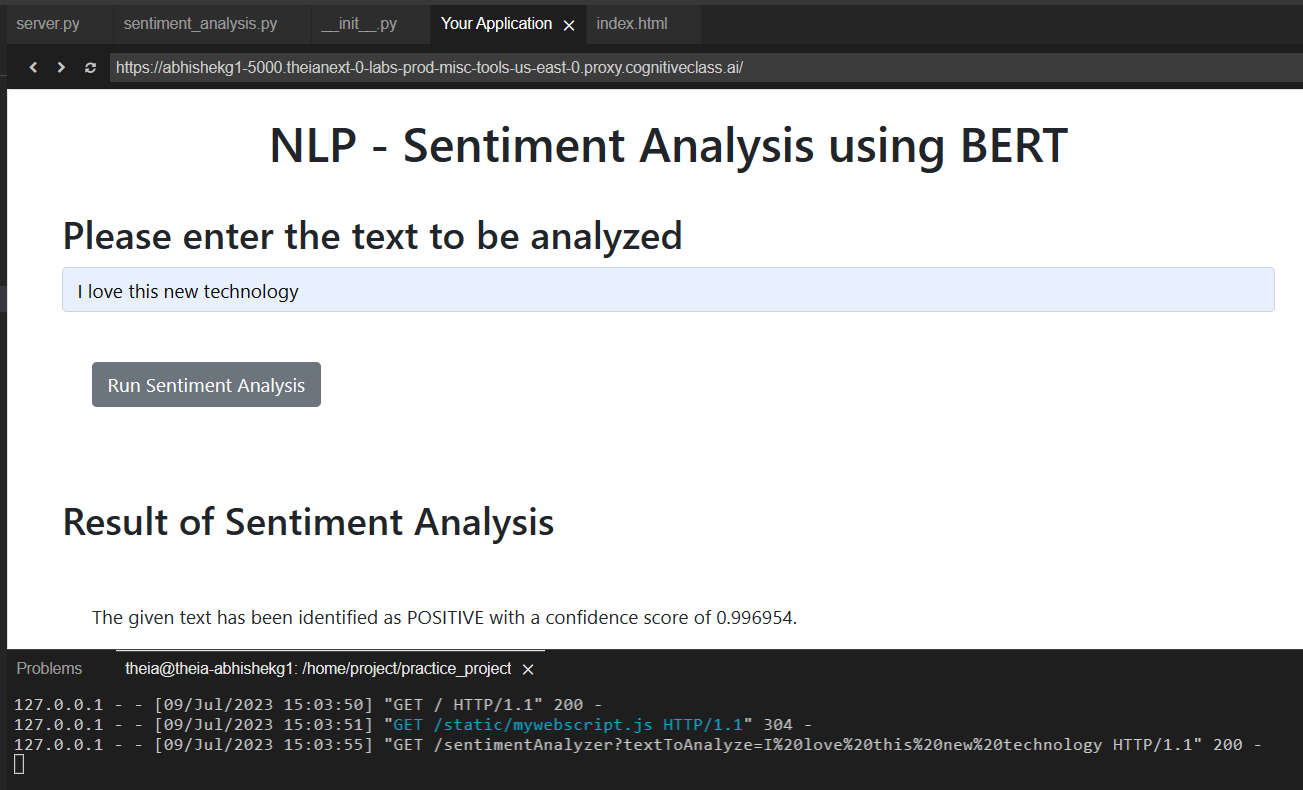
The application interface will open. Use the interface to test your application.
应用程序界面将打开。使用界面测试您的应用程序。
To stop the application, press Ctrl+C.
要停止应用程序,请按 Ctrl+C 。
Task 7: Incorporate Error handling 任务 7:加入错误处理
To incorporate error handling, we need to identify the different forms of error codes that may be received in response to the GET query initiated by the sent_analyzer function in server.py.
为了实现错误处理,我们需要识别在由 sent_analyzer 函数发起的 GET 查询响应中可能收到的不同错误代码形式。
This is already a part of the Watson NLP Library functions and can be observed on the terminal console where the code is running.
这已经是 Watson NLP 库函数的一部分,可以在运行代码的终端控制台上观察到。
Consider the image shown below.
考虑下图。
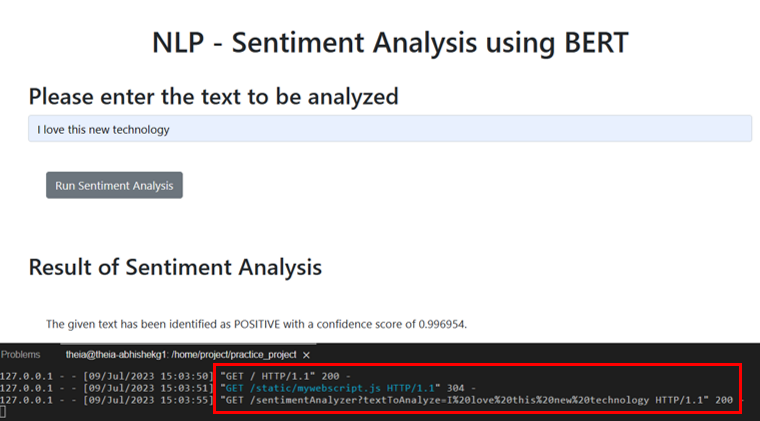
The codes indicate that the initial GET request was successful (200), the request was then successfully transferred to the Watson Library (304) and then the GET request to generate the response was also conducted successfully.
代码表明,最初的 GET 请求成功(200),然后请求成功转移到 Watson Library(304),接着生成响应的 GET 请求也成功执行。
In the case of invalid entries, the system responds with 500 error code, indicating that there is something wrong at the server end.
对于无效输入,系统会响应 500 错误代码,表明服务器端存在问题。
Invalid entry could be anything that the model is not able to interpret. However, in the situation of this error, this application output doesn't get updated.
无效输入可以是模型无法解释的任何内容。然而,在这种情况下,应用程序输出不会更新。
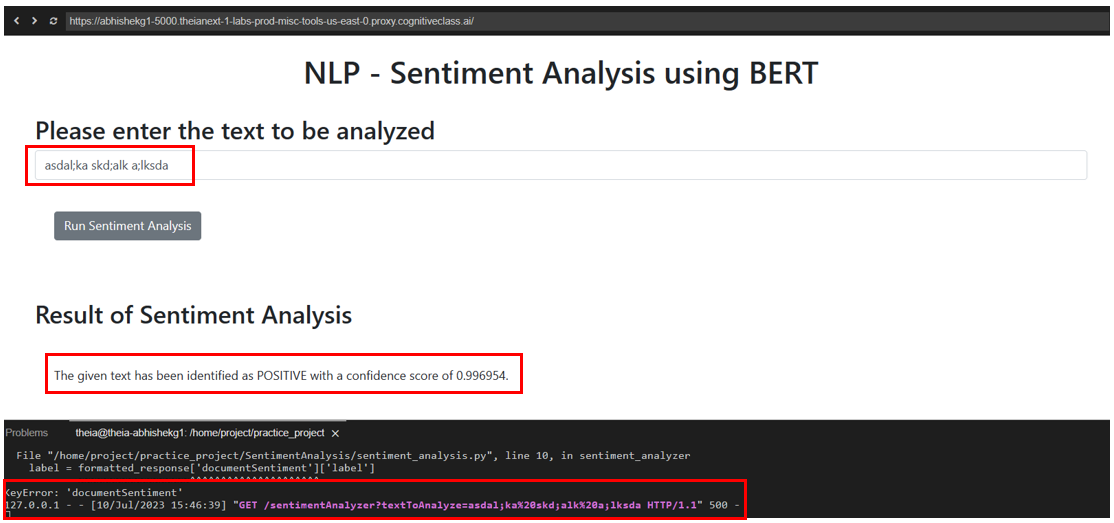
Note that the output on the interface is the same as before, the text being analyzed is a random text and the Watson AI libraries are throwing a 500 error confirming that the model has not been able to process the request.
请注意,界面上的输出与之前相同,被分析的文本是随机文本,而 Watson AI 库抛出 500 错误,确认模型未能处理请求。
To fix this bug in our application, we need to study the response received from the Watson AI library function, when the server generates 500 error. To test this, we need to retrace the steps taken in Task 2, and test the Watson AI library with an invalid string input.
为了修复我们应用程序中的这个错误,我们需要研究从 Watson AI 库函数接收到的响应,当服务器生成 500 错误时。为了测试这一点,我们需要重溯任务 2 中的步骤,并使用无效字符串输入测试 Watson AI 库。
Open a python shell in the terminal and run the following commands to check the required output after updating sentiment_analysis.py file with below.
在终端中打开 Python Shell,并运行以下命令以检查在用下方内容更新 sentiment_analysis.py 文件后的所需输出。
import requests

# Define the URL for the sentiment analysis API
url = "https://sn-watson-sentiment-bert.labs.skills.network/v1/watson.runtime.nlp.v1/NlpService/SentimentPredict"

# Set the headers with the required model ID for the API
headers = {"grpc-metadata-mm-model-id": "sentiment_aggregated-bert-workflow_lang_multi_stock"}

# Define the first payload with nonsensical text to test the API
myobj = { "raw_document": { "text": "as987da-6s2d aweadsa" } }

# Make a POST request to the API with the first payload and headers
response = requests.post(url, json=myobj, headers=headers)

# Print the status code of the first response
print(response.status_code)

# Define the second payload with a meaningful text to test the API
myobj = { "raw_document": { "text": "Testing this application for error handling" } }

# Make a POST request to the API with the second payload and headers
response = requests.post(url, json=myobj, headers=headers)

# Print the status code of the second response
print(response.status_code)
The console response looks as shown in the image below. The red boxes indicate the invalid text and its status code received, and the yellow boxes indicate the valid text and its status code received.
控制台响应如下所示。红色框标示无效文本及其接收到的状态码,黄色框标示有效文本及其接收到的状态码。
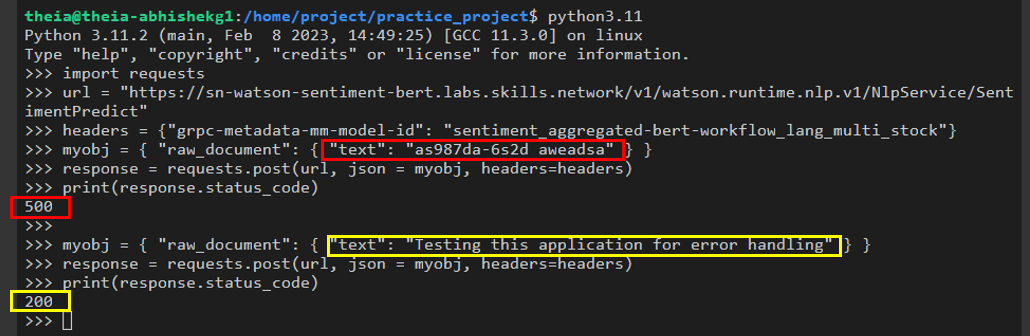
This enables you to modify the application in such a fashion, that we can send different outputs for different status codes.
这使您能够以这种方式修改应用程序,以便我们可以为不同的状态代码发送不同的输出。
In the first part of this task, you have to modify the sentiment_analyzer() function to return the both label and score as None in case of invalid text entry.
在这个任务的第一部分,你必须修改 sentiment_analyzer() 函数,使其在无效文本输入的情况下返回 label 和 score 作为 None 。
Click here for hint
点击此处获取提示
Make an if-else conditional statement in the sentiment_analyzer function to add the necessary functionality.
在 sentiment_analyzer 函数中创建一个 if-else 条件语句以添加必要的功能。
Click here for the solution
点击此处获取答案
sentiment_analysis.py
import requests
import json

def sentiment_analyzer(text_to_analyse):
    # Define the URL for the sentiment analysis API
    url = 'https://sn-watson-sentiment-bert.labs.skills.network/v1/watson.runtime.nlp.v1/NlpService/SentimentPredict'

    # Create the payload with the text to be analyzed
    myobj = { "raw_document": { "text": text_to_analyse } }

    # Set the headers with the required model ID for the API
    header = {"grpc-metadata-mm-model-id": "sentiment_aggregated-bert-workflow_lang_multi_stock"}

    # Make a POST request to the API with the payload and headers
    response = requests.post(url, json=myobj, headers=header)

    # Parse the response from the API
    formatted_response = json.loads(response.text)

    # If the response status code is 200, extract the label and score from the response
    if response.status_code == 200:
        label = formatted_response['documentSentiment']['label']
        score = formatted_response['documentSentiment']['score']
    # If the response status code is 500, set label and score to None
    elif response.status_code == 500:
        label = None
        score = None

    # Return the label and score in a dictionary
    return {'label': label, 'score': score}
Now, in server.py, the response to be sent to the console should also be different for the valid and invalid input types.
现在,在 server.py 中,发送到控制台的响应也应对有效和无效输入类型有所不同。
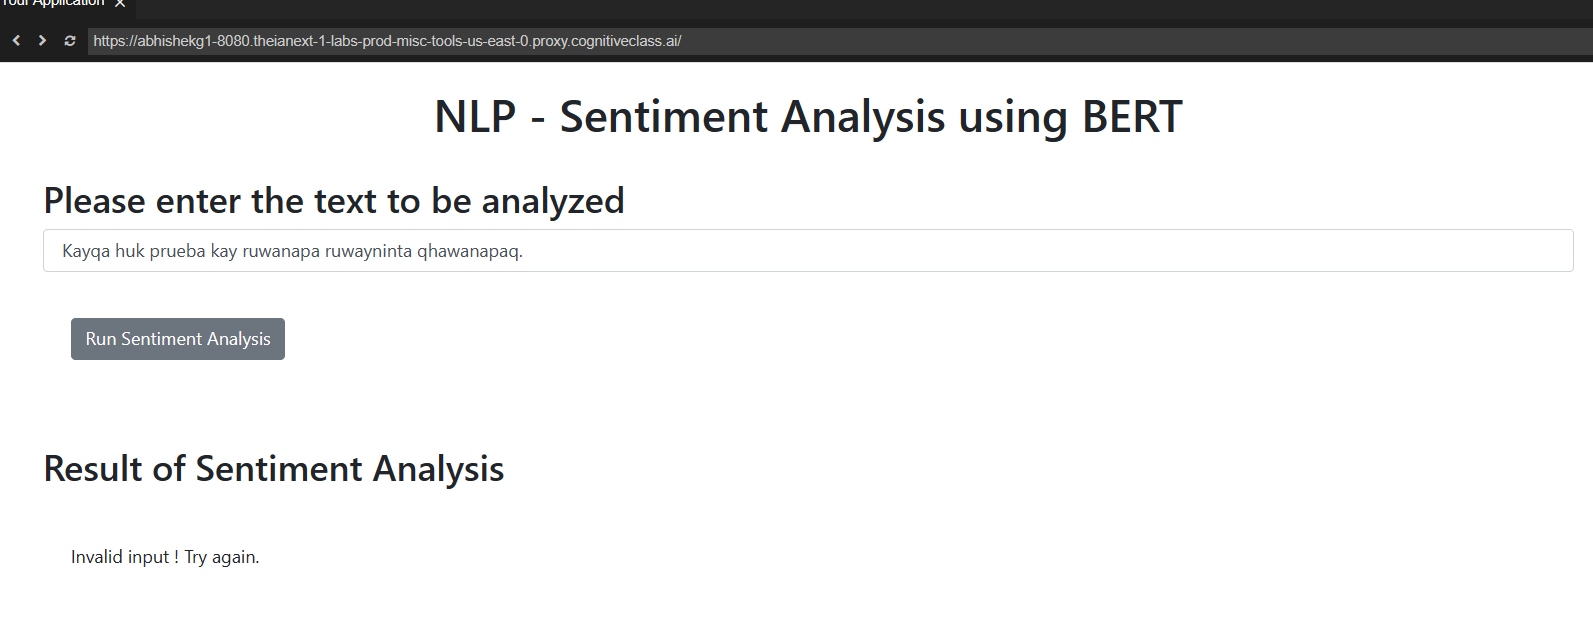
For invalid input, let the console print Invalid input ! Try again.
对于无效输入,让控制台打印 Invalid input ! Try again.
Click here for hint
点击此处获取提示
Make an if-else conditional statement in sent_analyzer function of server.py to check whether "label" is None or not.
在 server.py 的 sent_analyzer 函数中,编写一个 if-else 条件语句来检查"标签"是否为 None。
Click here for the solution
点击此处获取答案
def sent_analyzer():
    # Retrieve the text to analyze from the request arguments
    text_to_analyze = request.args.get('textToAnalyze')

    # Pass the text to the sentiment_analyzer function and store the response
    response = sentiment_analyzer(text_to_analyze)

    # Extract the label and score from the response
    label = response['label']
    score = response['score']

    # Check if the label is None, indicating an error or invalid input
    if label is None:
        return "Invalid input! Try again."
    else:
        # Return a formatted string with the sentiment label and score
        return "The given text has been identified as {} with a score of {}.".format(label.split('_')[1], score)
Now, your application is capable of responding appropriately to any form of inputs.
现在,您的应用程序能够适当地响应任何形式的输入。
Task 8: Run static code analysis 任务 8:运行静态代码分析
Finally, in Task 8, we check the quality of your coding skills as per the PEP8 guidelines by running static code analysis.
最后,在任务 8 中,我们根据 PEP8 指南通过运行静态代码分析来检查您的编程技能质量。
Normally, this is done at the time of packaging and unit testing the application. However, we have kept this step at the end of this project since the codes are updated in all tasks before this. Once your files for this project are now ready, let us test them for adherence to the PEP8 guidelines.
通常,这会在打包和单元测试应用程序时完成。然而,由于在此之前的所有任务中都会更新代码,我们将此步骤保留在本项目的末尾。一旦您的项目文件准备就绪,让我们测试它们是否符合 PEP8 指南。
The first step in this process is to install the PyLint library using the terminal.
此过程的第一步是使用终端安装 PyLint 库。
Click here for the solution
点击此处获取答案
python3.11 -m pip install pylint
Next, use pylint to run static code analysis on server.py.
接下来,使用 pylint 对 server.py 进行静态代码分析。
Click here for the solution
点击此处获取答案
On terminal bash execute the following command.
在终端 bash 中执行以下命令。
pylint server.py
If all aspects of PEP8 guide have been incorporated in your code, then the score generated should be 10/10. In case it isn't, follow the instructions given by pylint library to modify to correct the code appropriately.
如果你的代码已经包含了 PEP8 指南的所有方面,那么生成的分数应该是 10/10。如果不是,请按照 pylint 库的说明来修改代码以进行适当纠正。

This concludes the practice project.
本次练习项目到此结束。
(Optional) Additional Exercises (可选)补充练习
Interested learners can the try the following exercises on your own, for enhanced understanding of the concepts learnt through this project. No solution is being provided for these exercises. However, feel free to discuss and share your solutions with your peers in the course discussion forums.
有兴趣的学习者可以尝试以下练习,以加深对通过此项目所学概念的理解。这些练习不提供解决方案。但是,您可以自由地在课程讨论区与同伴讨论和分享您的解决方案。
- Run static code analysis on
sentiment_analysis.py. Try to achieve a 10/10 score. Hint: Docstrings
对sentiment_analysis.py运行静态代码分析。尝试达到 10/10 的分数。提示:文档字符串 - Test the capacity of your application in handling sentences of languages other than English, for e.g. French, German, etc. See if the application responds with an invalid text error.
测试您的应用程序处理非英语语言句子的能力,例如 e。法语、德语等。查看应用程序是否以无效文本错误进行响应。 - Currently, if the application is run WITHOUT supplying an input, i.e. leaving the text blank, the model still throws the same error of invalid text. Try including a special case, where a blank input receives a different error message.
目前,如果应用程序未提供输入,即文本为空,模型仍然会抛出相同的无效文本错误。尝试包含一个特殊情况,其中空白输入会收到不同的错误消息。
Conclusion 结论
Congratulations on completing this project.
恭喜您完成此项目。
With the completion of this project, you have:
随着本项目的完成,您将拥有:
- Created an AI based sentiment analysis application using Watson NLP embedded libraries.
使用 Watson NLP embedded libraries 创建了一个基于人工智能的情感分析应用程序。 - Formatted the output received from the Watson NLP library function to extract relevant information from it.
对 Watson NLP library 函数接收到的输出进行格式化,从中提取相关信息。 - Packaged the application and made it importable to any python code for usage.
将应用程序打包,使其可以被任何 Python 代码导入使用。 - Ran unit tests on the application and checked the validity of its outputs for different inputs.
对应用程序运行了单元测试,并检查了其对不同输入的输出有效性。 - Deployed the application using Flask framework.
使用 Flask 框架部署了应用程序。 - Incorporated error handling capability in the application, such that a response code of 500 receives an appropriate response from the application.
在应用程序中集成了错误处理功能,以便当响应代码为 500 时,应用程序能够给出适当的响应。 - Ran static code analysis on the code files to confirm their adherence to the PEP8 guidelines.
对代码文件进行静态代码分析,以确认其是否符合 PEP8 指南。