Module 05 · RStudio & GitHub
[Optional] Getting Started with Branches using Git Commands(可选)Git 命令分支入门
You would typically use Git commands from your own desktop/laptop. However, so you can get started using the commands quickly without having to download or install anything, we are providing an IDE with a Terminal on the Cloud. Simply click the Open Tool button below to launch the Skills Network Cloud IDE and in the new browser tab that launches, follow the instructions to practice the Git commands. After completing this lab you will be able to use git commands to start working with creating and managing your code branches, including:
通常情况下,您会在自己的台式机或笔记本电脑上使用 Git 命令。但是,为了让您能够快速开始使用命令,而无需下载或安装任何东西,我们提供了一个带有终端的云端 IDE。只需点击下方的“打开工具”按钮即可启动技能网络云端 IDE,并在新打开的浏览器标签页中,按照说明练习 Git 命令。 完成此实验后,您将能够使用 git 命令开始创建和管理您的代码分支,包括:
- create a new local repository using git init
使用 git init 创建一个新的本地仓库 - create and add a file to the repo using git add
使用 git add 创建并向仓库添加文件 - commit changes using git commit
使用 git commit 提交更改 - create a branch using git branch
使用 git branch 创建分支 - switch to a branch using git checkout
使用 git checkout 切换分支 - check the status of files changed using git status
使用 git status 检查文件更改状态 - review recent commits using git log
使用 git log 查看最近的提交 - revert changes using git revert
使用 git revert 撤销更改 - get a list of branches and active branch using git branch
使用 git branch 获取分支列表和当前活动分支 - merge changes in your active branch into another branch using git merge
使用 git merge 将活动分支中的更改合并到另一个分支
If you are unable to open the lab or view it properly, please click here to view the HTML version full screen in a new browser tab.
如果您无法打开实验或正确查看它,请点击此处在新浏览器标签页中以全屏方式查看 HTML 版本。

Estimated time needed: 25 minutes
预计所需时间:25 分钟
Pre-requisites 先决条件
This lab is designed to be run on Skills Network, Cloud IDE that runs on a Linux system in the cloud and already has git installed. If you intend to run this lab on your own system, please ensure you have git (on Linux or MacOS) or Git Bash (on Windows) installed. Please check if you are using valid credentials and make sure you have a stable internet connection and a supported broswer. In case of any issues, please consider clearing cache/cookies and retry.
本实验设计为在 Skills Network 上运行,该实验是在云中运行的 Linux 系统上的云 IDE,并且已经安装了 git。如果您打算在自己的系统上运行此实验,请确保您已安装 git(在 Linux 或MacOS 上)或 Git Bash(在 Windows 上)。请检查您是否使用有效的凭证,并确保您有稳定的互联网连接和支持的broswer。如果出现问题,请考虑清除缓存/cookies 并重试。
Initialize: Open a new terminal window 初始化:打开一个新的终端窗口
Open a terminal window in your IDE where you can start entering your shell and Git commands.
在你的 IDE 中打开一个终端窗口,你可以在其中开始输入你的 shell 和Git 命令。
- Click on the
Terminalmenu to the right of this instructions pane and then click onNew Terminal.
点击此说明窗格右侧的Terminal菜单,然后点击New Terminal。
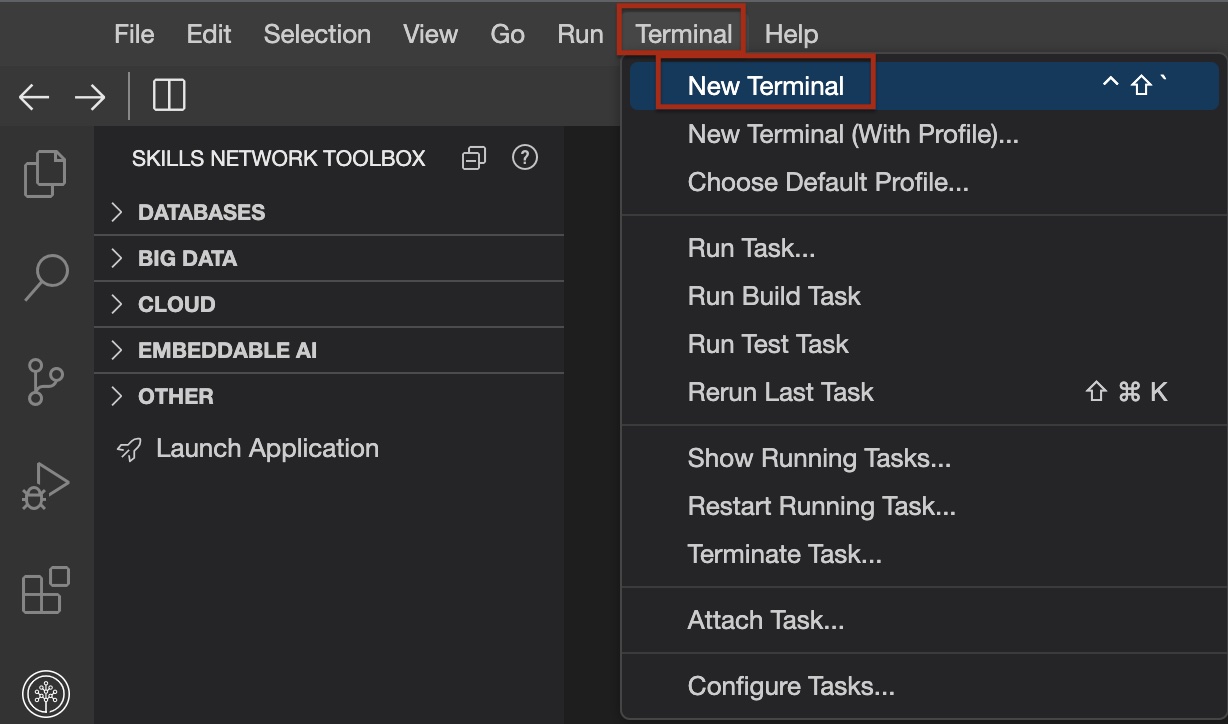
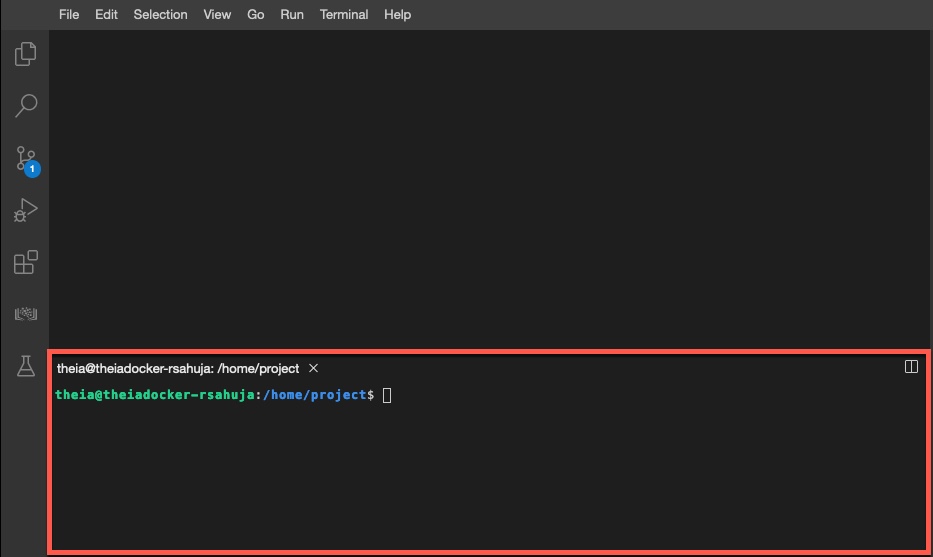
- This will add a new terminal window at the bottom where you can start entering commands.
这将添加一个新的终端窗口到底部,你可以在其中开始输入命令。
Exercise 1: Create a new local repo 练习 1:创建一个新的本地仓库
- Create a
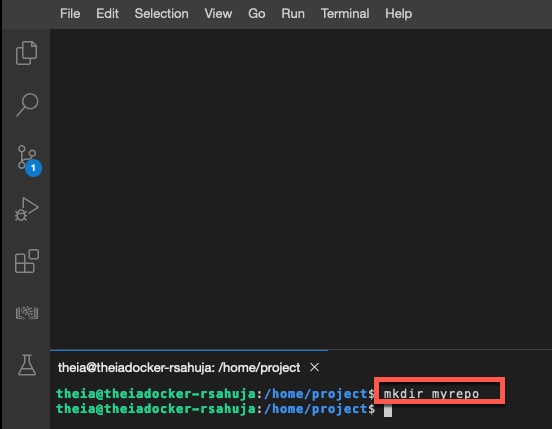
myrepodirectory by running themkdircommand given below in the terminal.
创建一个myrepo目录,通过在终端中运行以下mkdir命令。
mkdir myrepo
- Go into the
myrepodirectory by running the following command.
通过运行以下命令进入myrepo目录。
cd myrepo
- Initiate the
myrepodirectory as a git repository by using thegit initcommand.
使用git init命令将myrepo目录初始化为 git 仓库。
git init
- A local git repository is now initiated with a
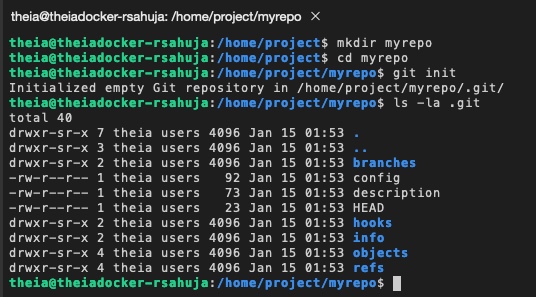
.gitfolder containing all the git files, which you can verify by doing a directory listing by running the following command into the terminal window. The.prefix will make the git directory hidden. The-laoption renders a long list, including the access permission, time of creation and other details for all the files in the hidden git directory.
现在已初始化一个本地git 仓库,其中包含一个.git文件夹,里面存放所有 git 文件,您可以通过在终端窗口中运行以下命令进行目录列表查看来验证。.前缀将使 git 目录隐藏。-la选项将显示一个长列表,包括隐藏 git 目录中所有文件的访问权限、创建时间和其他详细信息。
ls -la .git
The output shows the contents of the .git sub-directory which contains all the information required by git server.
输出显示了 .git 子目录的内容,该子目录包含git 服务器所需的所有信息。
Exercise 2: Create and add a file to the local repo 练习 2:创建并向本地仓库添加文件
- Now create an empty file named
newfileusing the followingtouchcommand.
现在使用以下touch命令创建一个名为newfile的空文件。
touch newfile
- Add this file to the repo use the following
git addcommand.
使用以下git add命令将此文件添加到仓库。
git add newfile

Exercise 3: Commit changes 练习 3:提交更改
- Before you commit the changes, you need to tell Git who you are. You can do this using the following commands. Replace "
you@example.com" with the email address you use to login to GitHub. Replace Your Name with your name.
在提交更改之前,您需要告诉 Git 您是谁。您可以使用以下命令完成此操作。将 "you@example.com" 替换为您登录 GitHub 时使用的电子邮件地址。将您的姓名替换为您的姓名。Please note the email and name have to be within quotes.
请注意,电子邮件地址和姓名必须用引号括起来。
git config --global user.email "you@example.com"
git config --global user.name "Your Name"
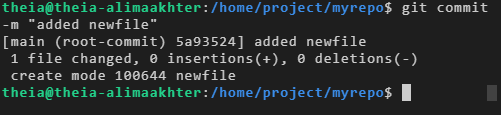
- You can now commit your changes using the following
git commitcommand.
现在您可以使用以下git commit命令提交更改。
Note that the commit requires a message, which you can include using the
-mparameter.
请注意,提交需要一条消息,您可以使用-m参数包含该消息。
git commit -m "added newfile"
Exercise 4: Create a branch 练习 4:创建一个分支
- Your previous commit created a default main branch called
main.
您之前的提交创建了一个默认的主分支,名为main。 - To make subsequent changes in your repository, create a new branch in your local repostitory. Run the following
git branchcommand into the terminal to create a branch calledmy1stbranch.
要在您的仓库中进行后续更改,请在本地仓库中创建一个新分支。在终端中运行以下git branch命令来创建一个名为my1stbranch的分支。
git branch my1stbranch
Exercise 5: Get a list of branches and active branch 练习 5:获取分支列表和活动分支
- Check the list of branches your repository contains by running the following
git branchcommand.
通过执行以下git branch命令,检查您的存储库包含的分支列表。
git branch
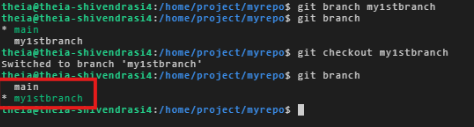
- Note that the output lists two branches: The default
mainbranch with an asterisk*next to it indicating that it is the currently active branch and the newly createdmys1stbranch.
请注意,输出列出了两个分支:默认的main分支,其旁边有一个星号*,表示它是当前活动的分支,以及新创建的mys1stbranch分支。

Exercise 6: Switch to a different branch 练习 6:切换到不同的分支
- Since you now want to work in the new branch to make your changes, run the following
git checkoutcommand to make it the active branch.
既然您现在想在新分支上工作以进行更改,请运行以下git checkout命令将其设置为活动分支。
git checkout my1stbranch
- Verify that the new branch is now the active branch by running the following
git branchcommand.
通过运行以下git branch命令来验证新分支现在已是活动分支。
git branch
- Note that the asterisk
*is now next to themy1stbranch, indicating that it is now active.
请注意,星号*现在紧邻my1stbranch,表明它现在是活动的。
As a shortcut, instead of creating a branch using
git branchand then making it active usinggit checkout, you can use the git checkout command followed by the-boption, that creates the branch and makes it active in one step.
作为快捷方式,您可以直接使用 git checkout 命令后跟-b选项,该选项可一步创建分支并将其设置为活动分支,而无需先使用git branch创建分支,再用git checkout设置为活动分支。
git checkout -b my1stbranch
Exercise 7: Make changes in your branch and check the status of files added or changed 练习 7:修改您的分支并检查已添加或更改的文件状态
- Make some changes to your new branch, called
my1stbranch. Start by adding some text tonewfileby running the following command into the terminal that will append the string "Here is some text in my newfile." into the file.
对名为my1stbranch的新分支进行一些更改。首先,通过在终端中运行以下命令,向newfile添加一些文本,将字符串 "Here is some text in my newfile." 追加到文件中。
echo 'Here is some text in my newfile.' >> newfile
- Verify the text has been added by running the following
catcommand.
通过运行以下cat命令来验证文本是否已添加。
cat newfile

- Now, create another file called
readme.mdusing the following command.
现在,使用以下命令创建另一个名为readme.md的文件。
touch readme.md
- And now, add it to the repo with the following
git addcommand.
然后,使用以下git add命令将其添加到仓库中。
git add readme.md
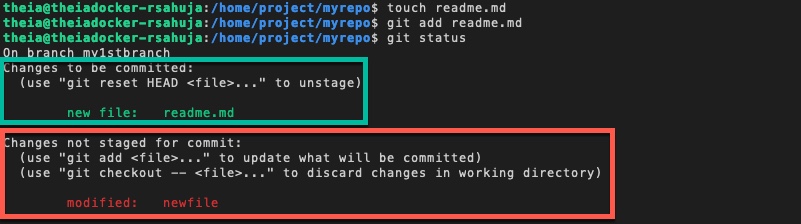
- So far, in your new branch, you have edited the
newfileand added a file calledreadme.md. You can easily verify the changes in your current branch using thegit statuscommand.
到目前为止,在你的新分支中,你已经编辑了newfile并添加了一个名为readme.md的文件。你可以使用git status命令轻松验证当前分支中的更改。
git status
- The output of the
git statuscommand shows that the filereadme.mdhas been added to the branch and is ready to be committed since you added it to the branch usinggit add. However, even though you modified the file callednewfileyou did not explicitly add it usinggit add, and hence it is not ready to be committed.git status命令的输出显示,由于你使用git add将readme.md添加到分支中,该文件已添加到分支并准备好提交。然而,尽管你修改了名为newfile的文件,但你没有使用git add明确地添加它,因此它还没有准备好提交。
- A shortcut to adding all modifications and additions is to use the following
git addcommand with an asterisk*. This will also add the modified filenewfileto the branch and make it ready to be committed.
添加所有修改和新增内容的快捷方式是使用带有星号*的git add命令。这将把修改的文件newfile添加到分支中,并使其准备好提交。
git add *
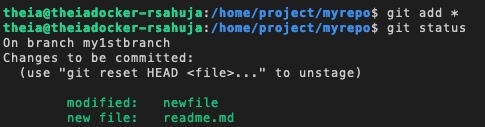
- Let's check the status again.
我们再次检查状态。
git status
- The output now shows that both the files can now be comitted.
输出现在显示,这两个文件现在都可以提交了。
Exercise 8: Commit and review commit history 练习 8:提交并审查提交历史
- Now that your changes are ready, you can save them to the branch using the following commit command with a message indicating the changes.
现在您的更改已准备好,您可以使用以下提交命令将它们保存到分支中,并附带一条说明更改的消息。
git commit -m "added readme.md modified newfile"
- We can run the following
git logcommand to get a history of recent commits:
我们可以运行以下git log命令来获取最近的提交历史记录:
git log
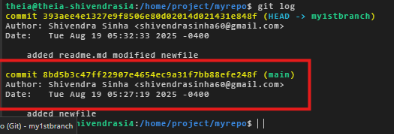
- The log shows two recent commits: The last commit to
my1stbranchas well as the previous commit tomain.
日志显示了两个最近的提交:最后一次提交到my1stbranch以及上一次提交到main。
Note: To exit the
git logcommand, simply press the "Q" key. This action will close the log view and bring you back to the command prompt.
注意:要退出git log命令,只需按“Q”键。此操作将关闭日志视图并将您返回到命令提示符。
Exercise 9: Revert committed changes 练习 9:撤销已提交的更改
- Sometimes, you may not fully test your changes before committing them, which may have undesirable consequences. You can back out your changes by using a
git revertcommand like the following.
有时,在提交更改之前您可能无法完全测试它们,这可能会导致不希望的结果。您可以通过使用类似以下git revert命令来回滚更改。
You can either specify the ID of your commit that you can see from the previous log output or use the shortcutHEADto rollback the last commit:
您可以通过指定从先前的日志输出中可以看到的提交 ID,或者使用快捷方式HEAD来回滚最后一个提交:
git revert HEAD --no-edit
NOTE: 1. If you don't specify the
--no-editflag, you may be presented with an editor screen showing the message with changes to be reverted. In that case, press theControl(or Ctrl) key simultaneously withX.
注意:1. 如果您没有指定--no-edit标志,系统可能会显示一个编辑器屏幕,其中显示要撤销的更改信息。在这种情况下,请同时按下Control(或 Ctrl)键和X。
2.git revert HEADdoes not delete a file, it adds a new commit that undoes the changes introduced by the previous commit.
2.git revert HEAD不会删除文件,它添加一个新的提交,该提交会撤销先前提交引入的更改。
- The output shows the most recent commit with the specified id has been reverted.
输出显示,具有指定 ID 的最新提交已被撤销。

Exercise 10: Merge changes into another branch 练习 10:将更改合并到另一个分支
- Let's make one more change in your currently active
my1stbranchusing the following commands.
让我们在您当前激活的my1stbranch中使用以下命令进行最后一次更改。
touch goodfile
git add goodfile
git commit -m "added goodfile"
git log
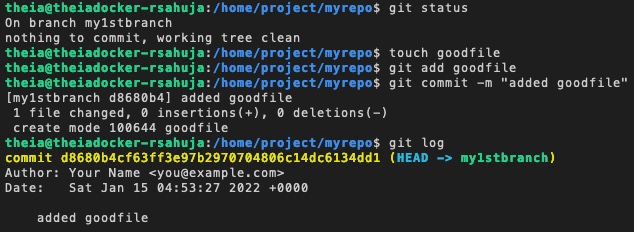
- The output of the log shows the newly added
goodfilehas been comitted to themy1stbranchbranch:
日志输出显示,新添加的goodfile已提交到my1stbranch分支:
Note: To exit the
git logcommand, simply press the "Q" key. This action will close the log view and bring you back to the command prompt.
注意:要退出git log命令,只需按“Q”键。此操作将关闭日志视图并将您返回到命令提示符。
- Now, let's merge the contents of the
my1stbranchinto themainbranch. We will first need to make themainbranch active using the followinggit checkoutcommand.
现在,让我们将my1stbranch的内容合并到main分支。我们首先需要使用以下git checkout命令将main分支设为激活状态。
git checkout main
- Now, let's merge the changes from
my1stbranchinto master.
现在,让我们将my1stbranch的更改合并到 master。
git merge my1stbranch
git log
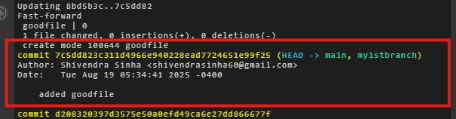
- Output and log shows the successful merging of the branch.
输出和日志显示分支已成功合并。
- Now that changes have been merged into
mainbranch, themy1stbranchcan be deleted using the followinggit branchcommand with the-doption:
由于更改已合并到main分支,可以使用以下git branch命令并使用-d选项删除my1stbranch:
git branch -d my1stbranch

Exercise 11: Practice on your own 练习 11:自行练习
- Create a new directory and branch called
newbranch
创建一个名为newbranch的新目录和分支 - Make
newbranchthe active branch
将newbranch设为活动分支 - Create an empty file called
newbranchfile
创建一个名为newbranchfile的空文件 - Add the newly created file to your branch
将新创建的文件添加到你的分支 - Commit the changes in your
newbranch
将您的newbranch中的更改提交 - Revert the last committed changes
撤销最后一次提交的更改 - Create a new file called
newgoodfile
创建一个名为newgoodfile的新文件 - Add the latest file to
newbranch
将最新文件添加到newbranch - Commit the changes 提交更改
- Merge the changes in
newbranchintomain
将newbranch中的更改合并到main中
Summary 摘要
In this lab, you have learned how to create and work with branches using Git commands in a local repository. In a subsequent lab, you will learn how to synchronize changes in your local repository with remote GitHub repositories.
在本实验中,你学习了如何使用 Git 命令在本地仓库中创建和管理分支。在后续的实验中,你将学习如何将本地仓库中的更改与远程 GitHub 仓库同步。