Module 04 · Jupyter Notebooks and JupyterLab
(Optional): Hands-on Lab: Download & Install Anaconda on Windows(可选)动手实验:在 Windows 下载与安装 Anaconda
Time efforts: 15 minutes 时间投入:15 分钟
Objectives of exercise 练习目标
- Download & install Anaconda
下载并安装 Anaconda - Create Anaconda Environment for R and Python
为 R 和 Python 创建 Anaconda 环境 - Install and run Jupyter Notebook
安装并运行 Jupyter Notebook
Overview of Anaconda Anaconda 概述
There are several cloud-based data science tools that can make team collaboration more accessible. At times it's useful to work directly on your desktop.
存在一些基于云的数据科学工具,可以更便捷地实现团队协作。有时直接在您的桌面工作也是有益的。
Anaconda Distribution is an Open Source distribution of Python and R languages. It comes with a repository of a large number of packages for data science and machine learning, with the most popular and commonly used ones pre-installed. It includes Anaconda Navigator, a graphical interface (GUI) that contains several tools, and IDEs such as Jupyter Notebooks and R Studio. It has binaries for major platforms, including Windows, Linux, and macOS. This lab includes instructions for downloading and installing Anaconda on Windows.
Anaconda 发行版是一个开源的 Python 和 R 语言发行版。它包含大量用于数据科学和机器学习的软件包仓库,其中最受欢迎和常用的软件包已预装。它包括 Anaconda 导航器,一个图形界面(GUI),其中包含多个工具,以及 Jupyter Notebooks 和 R Studio 等集成开发环境(IDE)。它支持主要平台,包括 Windows、Linux 和 macOS。本实验包含在 Windows 上下载和安装 Anaconda 的说明。
Exercise 1: Download & Install Anaconda Distribution 练习 1:下载并安装Anaconda发行版
Step 1: Use the below link to download the Anaconda distribution:
步骤 1:使用以下链接下载Anaconda 发行版:
Link for Download Anaconda Distribution: https://www.anaconda.com/products/distribution
Anaconda 发行版下载链接:https://www.anaconda.com/products/distribution

Note: Depending on your Operating system, it would show the download link specific to your OS. Click the Download button to download it to your local machine.
注意:根据您的操作系统,将显示针对您操作系统的特定下载链接。点击下载按钮将其下载到您的本地计算机。
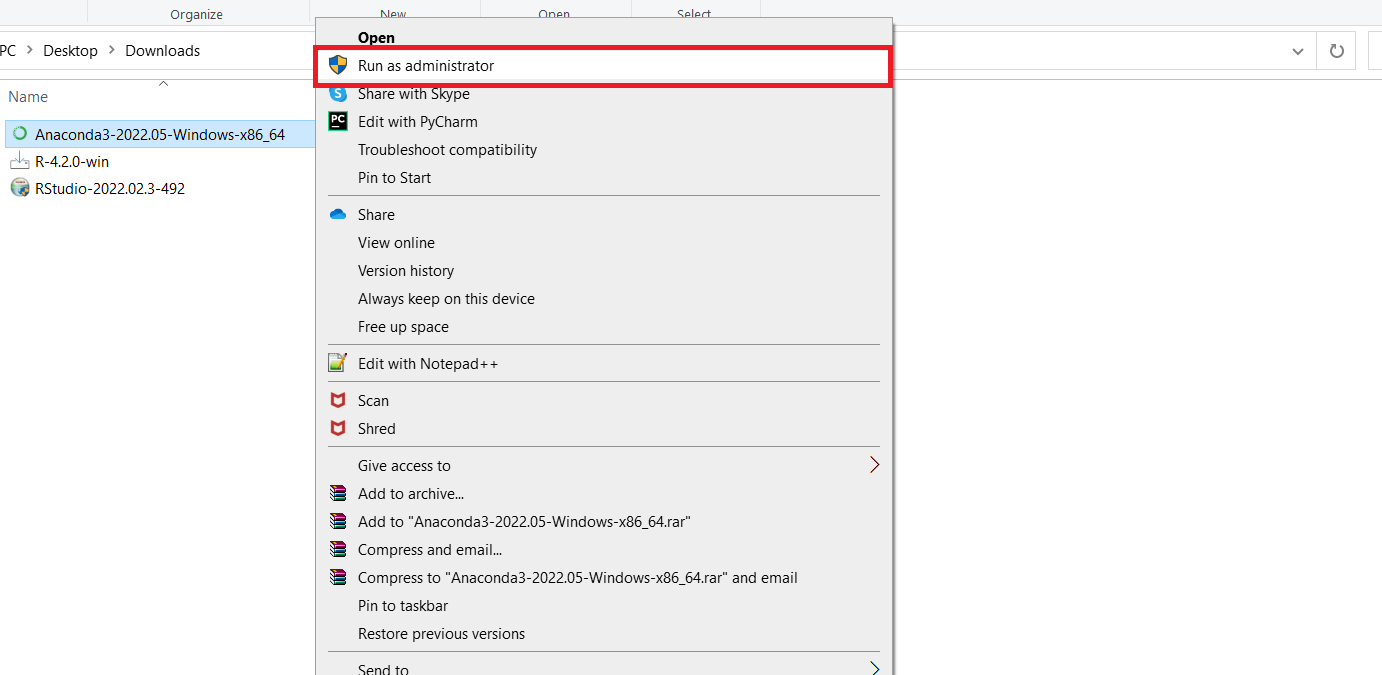
Step 2: Once the download completes, right-click the downloaded file and run it as Administrator.
第二步:下载完成后,右键点击下载的文件,以管理员身份运行。
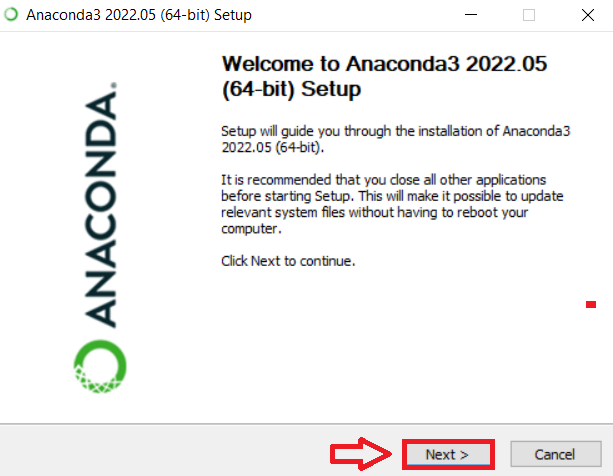
Step 3: At the beginning of the welcome window, you need to click Next to confirm the installation.
第三步:在欢迎窗口的初始界面,需要点击“下一步”以确认安装。
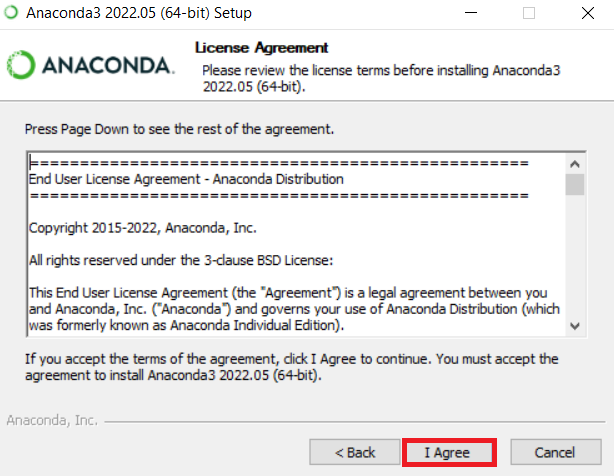
Step 4: Agree to the license.
第四步:同意许可协议。
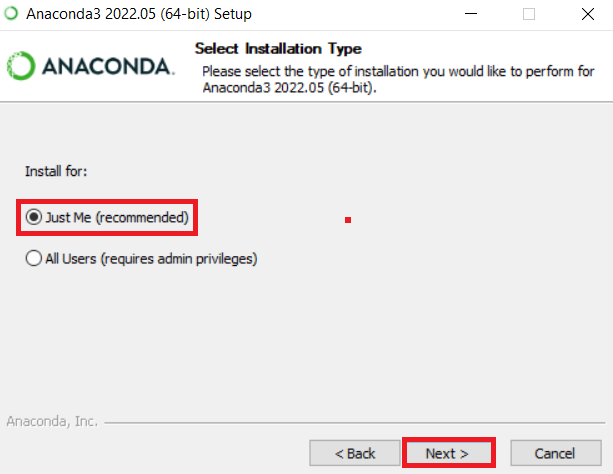
Step 5: In the installation window, select Just me, and click Next.
第五步:在安装窗口中,选择“仅我”,然后点击“下一步”。
Step 6: Select the folder where you would like to Install Anaconda, or retain the Default installation location and click Next.
第六步:选择您希望安装 Anaconda 的文件夹,或保留默认的安装位置,然后点击“下一步”。
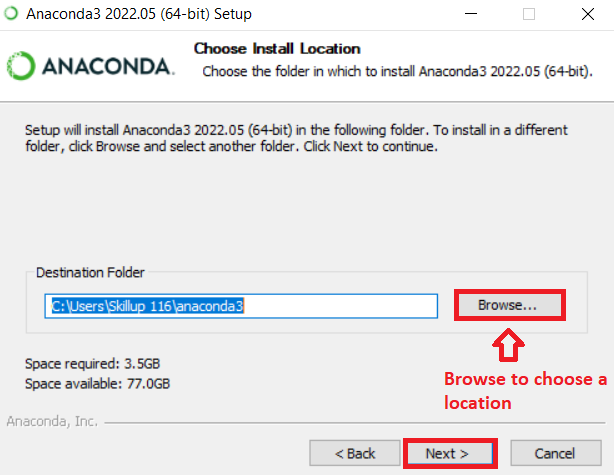
Step 7: In the Advanced Installation Options window, select Register Anaconda3 as the default Python 3.9 option, and click Install.
第七步:在高级安装选项窗口中,将Anaconda3 注册为默认的 Python 3.9 选项,然后点击“安装”。
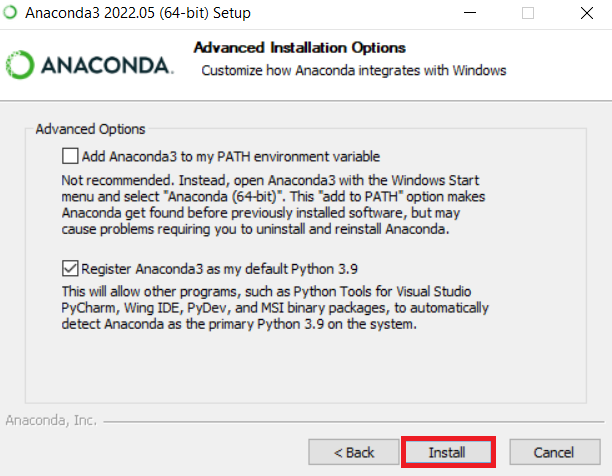
Step 8: You need to wait for the installation to complete. Once installation completes, click Next.
第八步:您需要等待安装完成。安装完成后,点击“下一步”。
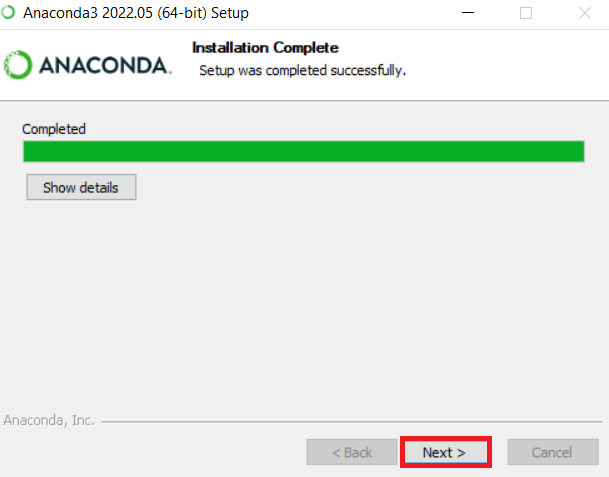
Step 9: Click Next. 第九步:点击“下一步”。
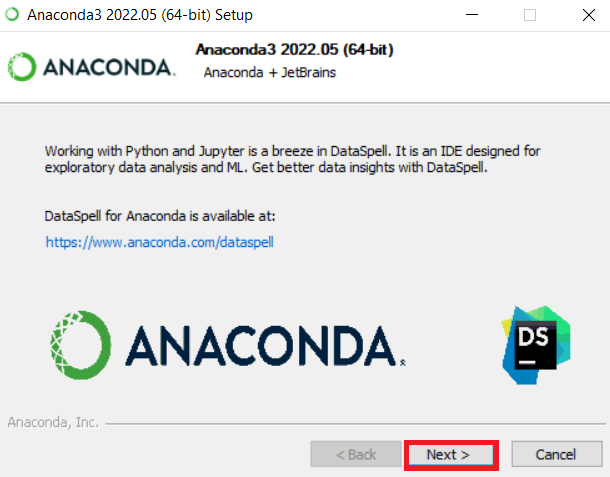
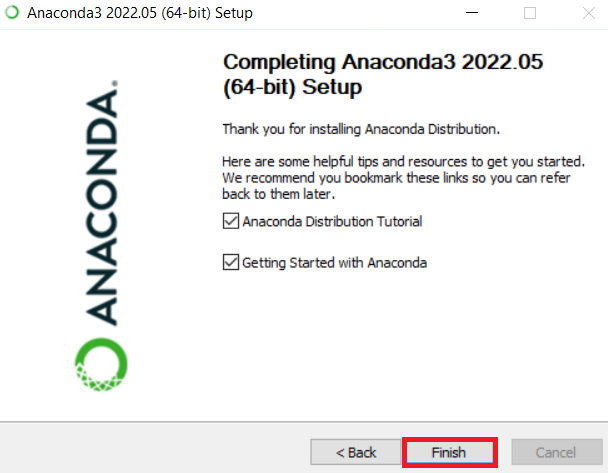
Step 10: Click Finish to complete the installation of the Anaconda distribution.
第 10 步:点击“完成”以完成Anaconda的安装。
Exercise 2: Create Anaconda Environment 练习 2:创建 Anaconda 环境
Anaconda environment is a directory containing a specific collection of conda packages you have installed. For example, you may have one environment with NumPy 1.7 and its dependencies and another environment with NumPy 1.6 for legacy testing.
Anaconda环境是一个包含您已安装的特定 conda 包集合的目录。例如,您可能有一个包含 NumPy 1.7 及其依赖项的环境,以及另一个用于遗留测试的包含 NumPy 1.6 的环境。
Ref: https://conda.io/projects/conda/en/latest/user-guide/concepts/environments.html
参考:https://conda.io/projects/conda/en/latest/user-guide/concepts/environments.html
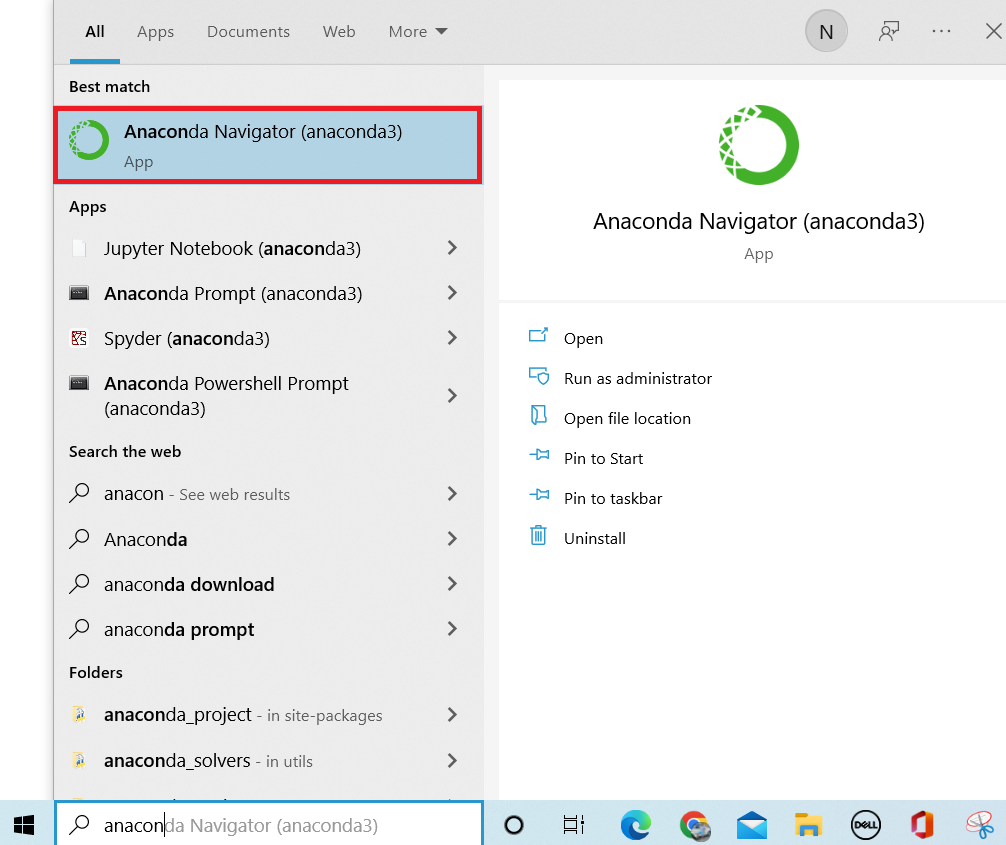
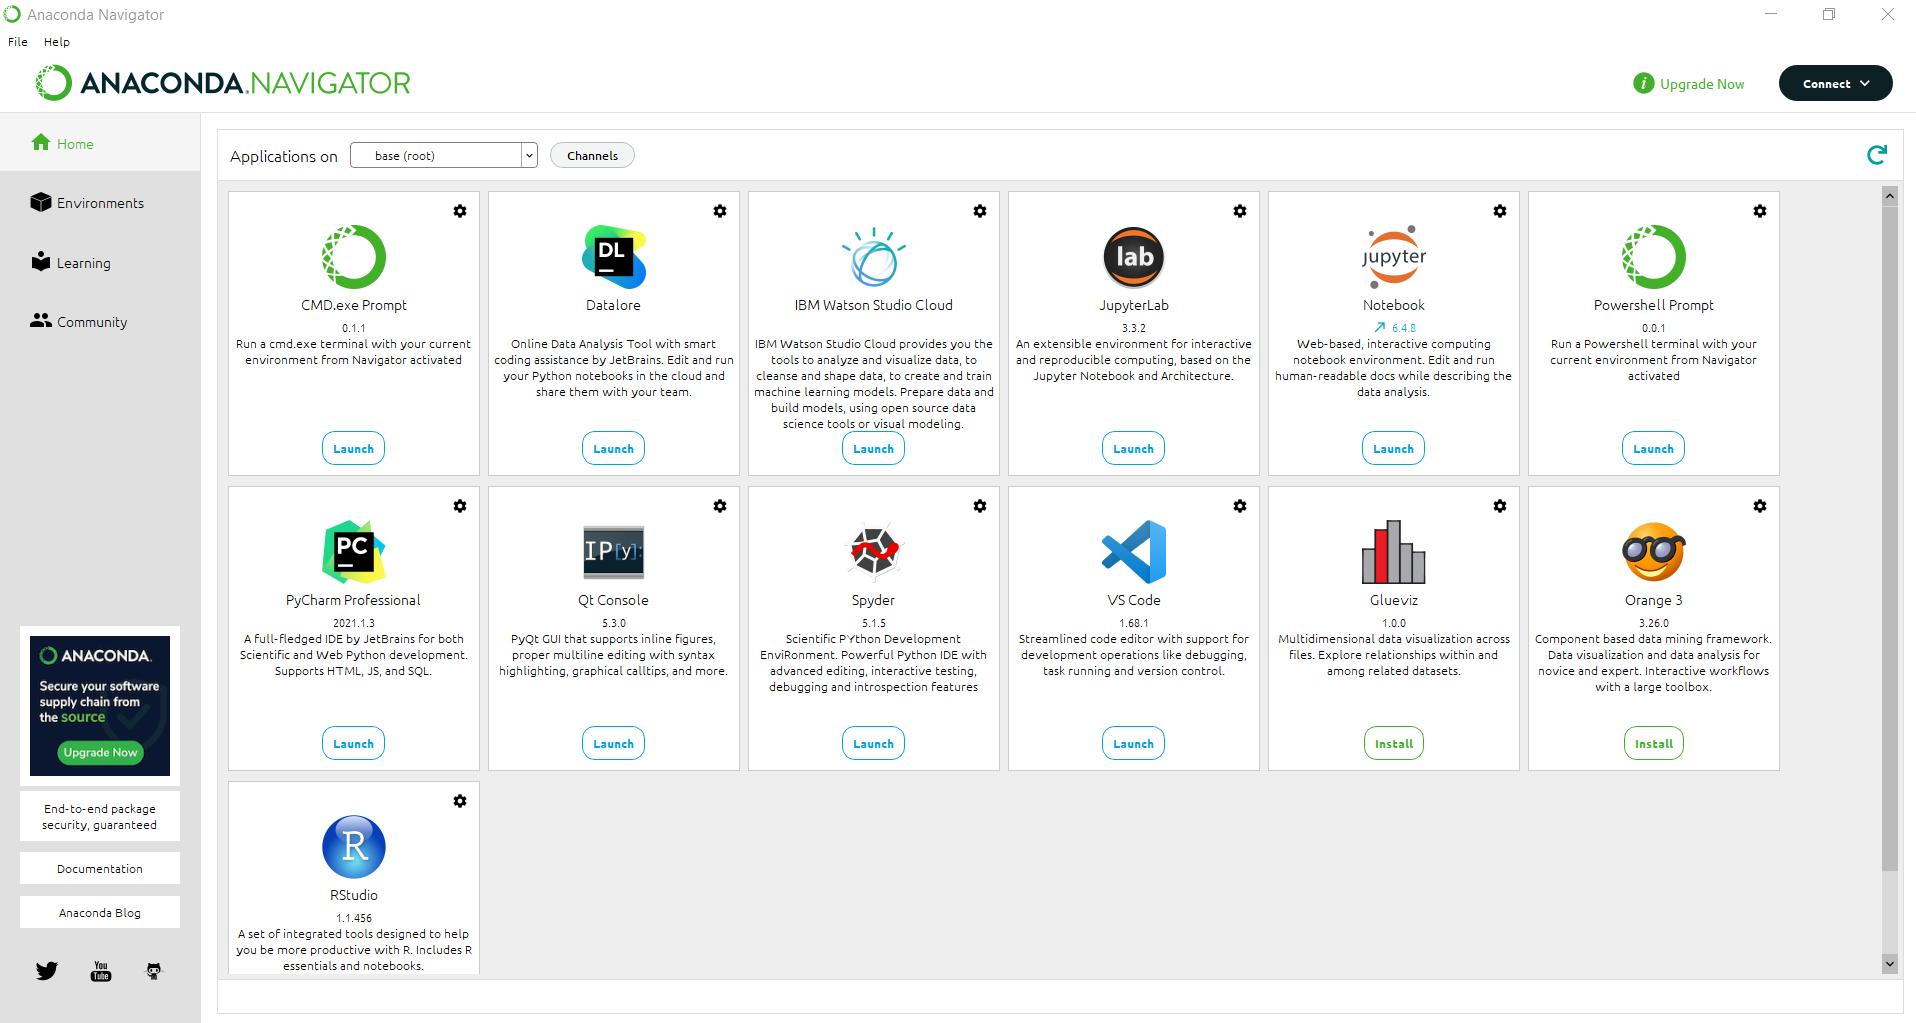
Step 1: Open the Anaconda Navigator from the Windows Start menu.
第一步:从 Windows 开始菜单中打开 Anaconda Navigator。
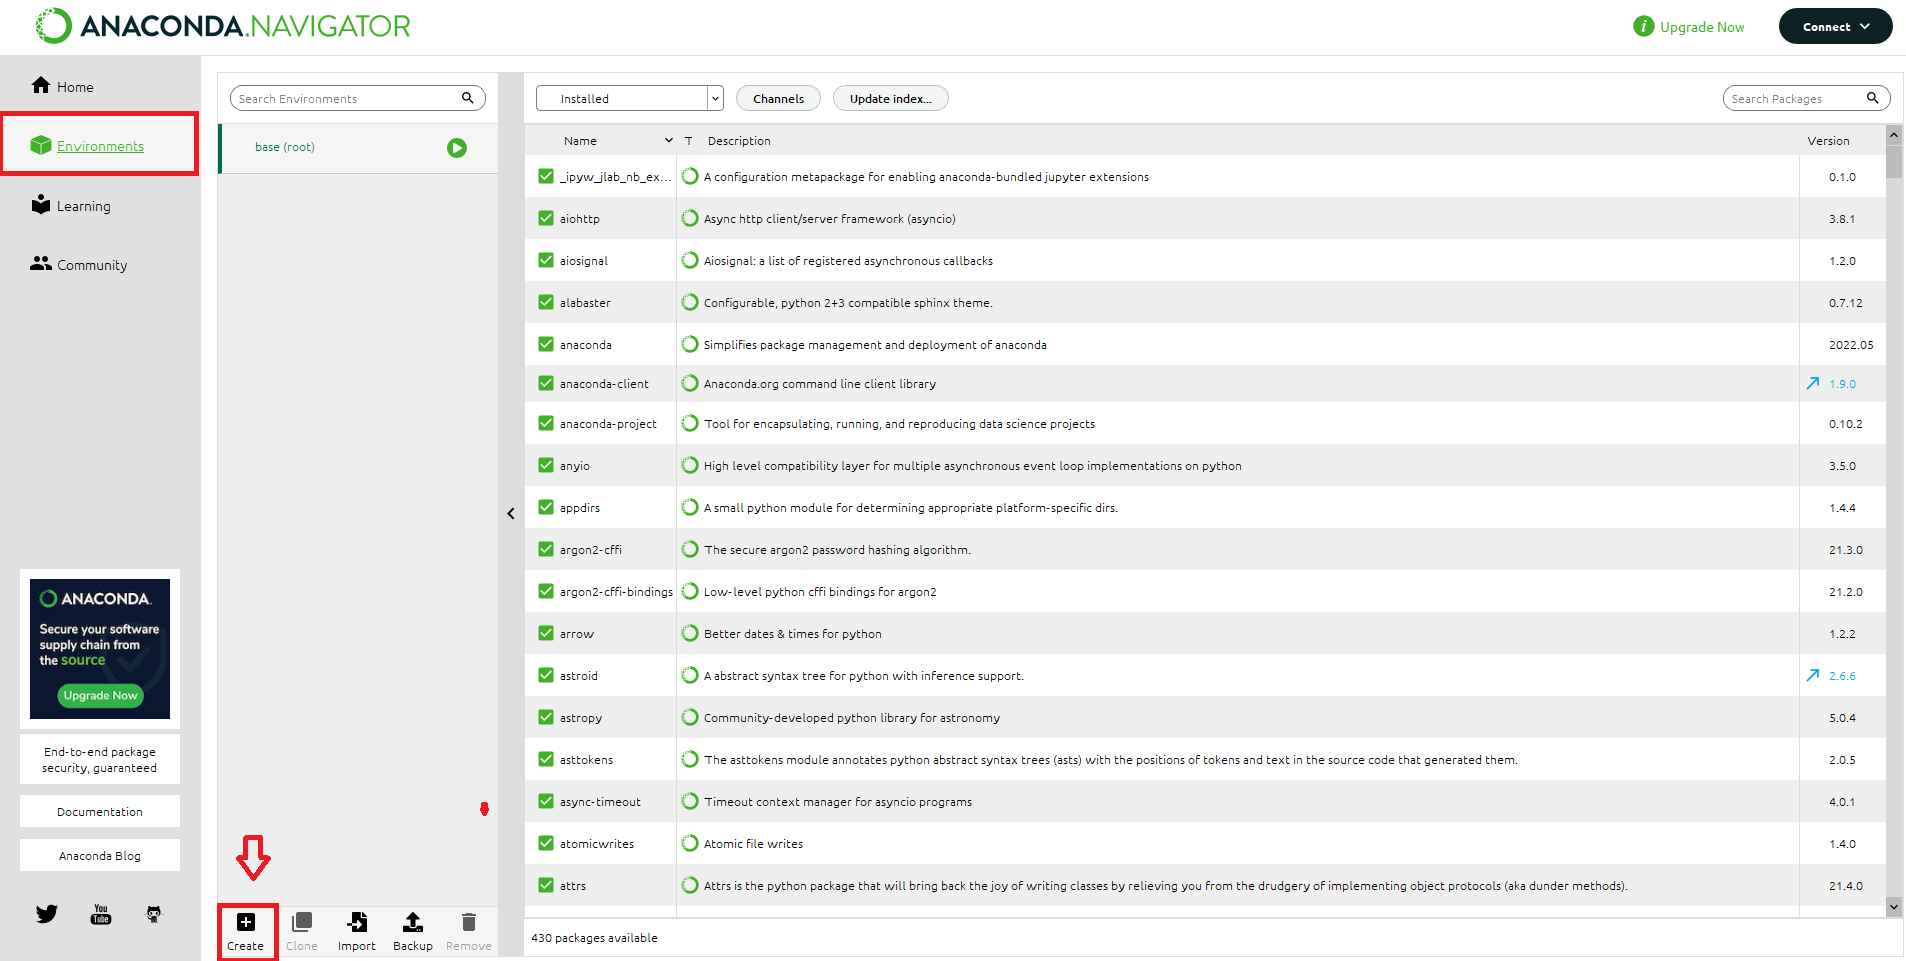
Step 2: Create an environment using Anaconda Navigator. Go to the Environments tab and click Create (at the bottom menu as highlighted below) to create an icon on the Anaconda environment.
第二步:使用Anaconda Navigator. Go to the Environments tab and click Create (at the bottom menu as highlighted below) to create an icon on the Anaconda环境创建一个环境。
Note: All the macOS users, select Update index and all your packages will be updated.
注意:所有 macOS 用户,选择更新索引,所有您的软件包都将被更新。
Note: It is always helpful to create a separate environment because different projects require different packages.
注意:创建单独的环境总是有帮助的,因为不同的项目需要不同的软件包。
Step 3: Give a name for your environment, select the suitable version and language and click Create.
第 3 步:为您的环境命名,选择合适的版本和语言,然后点击创建。
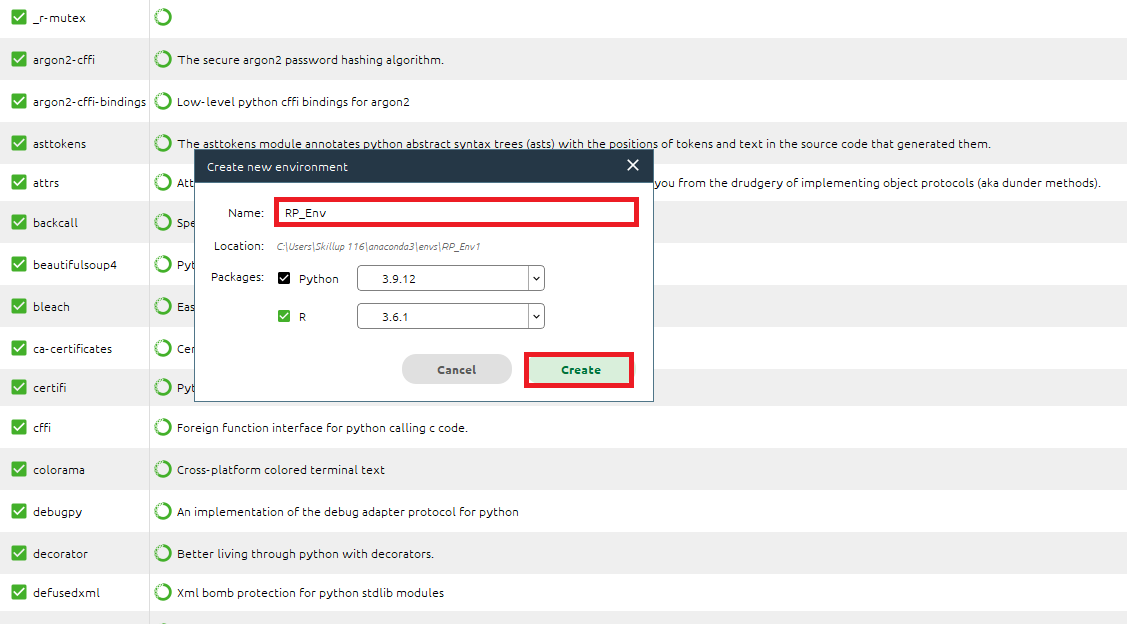
Note: The macOS users must uncheck Python and then create the environment.
注意:macOS用户必须取消勾选 Python,然后创建环境。
Step 4: Once you create an Anaconda environment, go back to the Home Page and Launch Jupyter and create a Python Notebook (make sure to select the right environment).
第 4 步:创建 Anaconda 环境后,返回主页,启动 Jupyter 并创建 Python 笔记本(确保选择正确的环境)。
Note: The macOS users need to restart their Anaconda prompt first and then launch their Jupyter Notebook.
注意:macOS 用户需要先重启 Anaconda 提示符,然后启动 Jupyter Notebook。
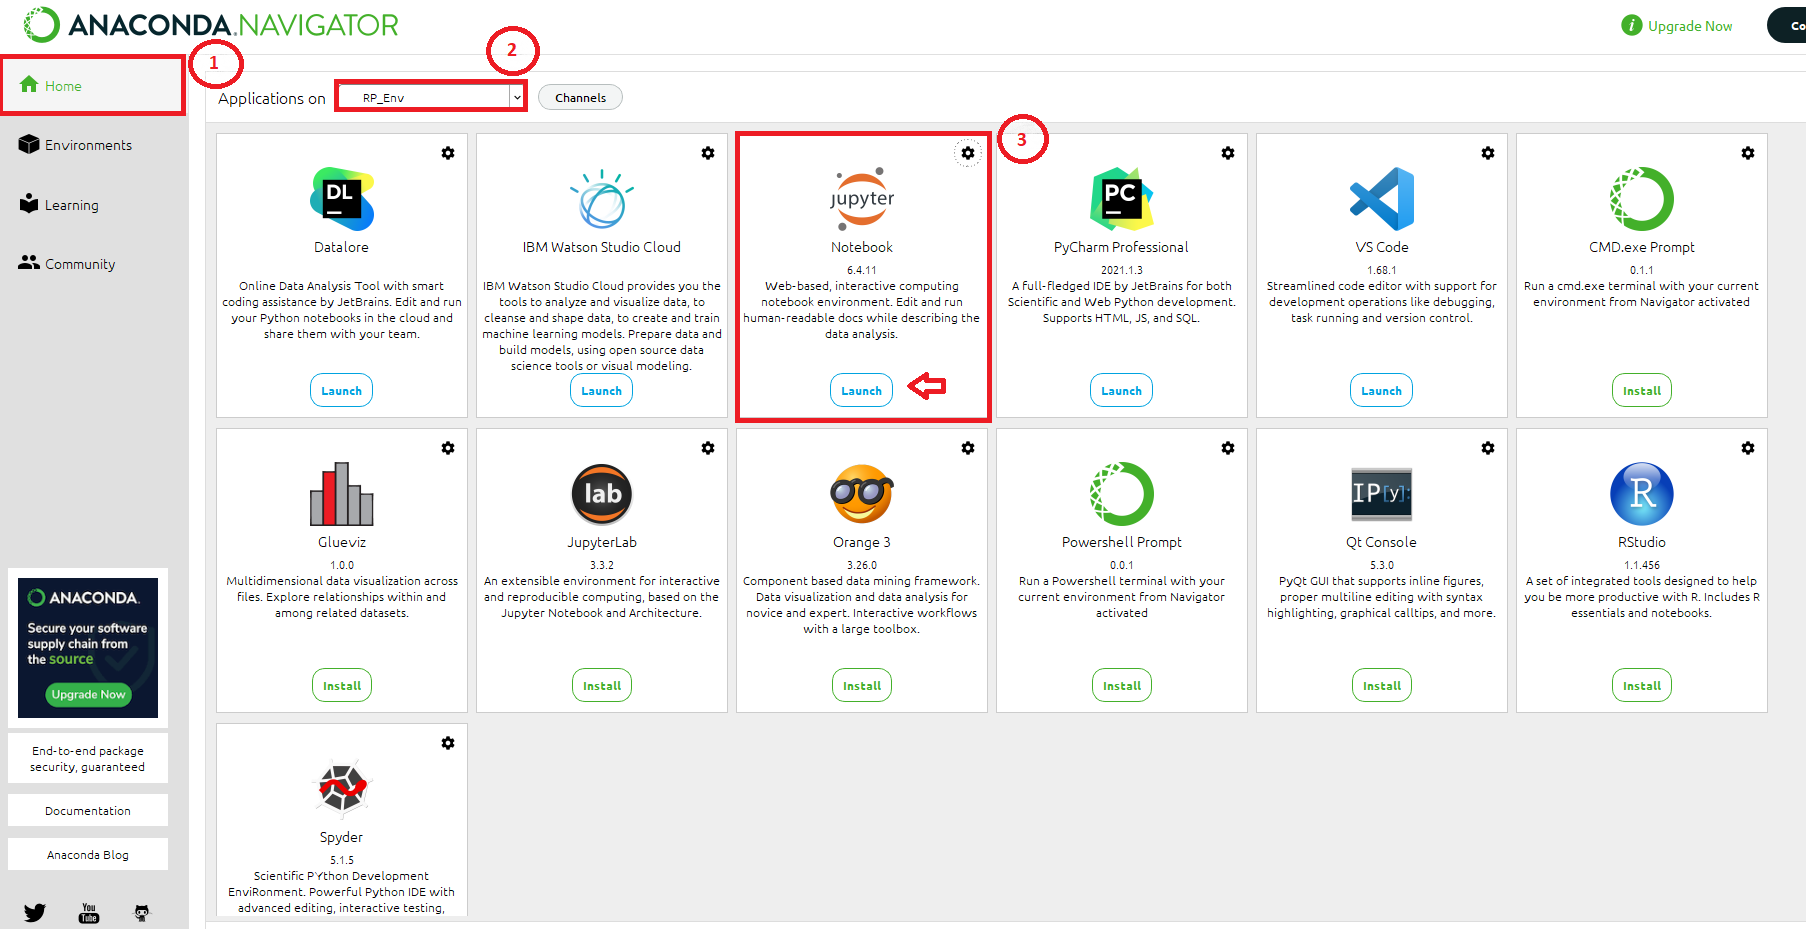
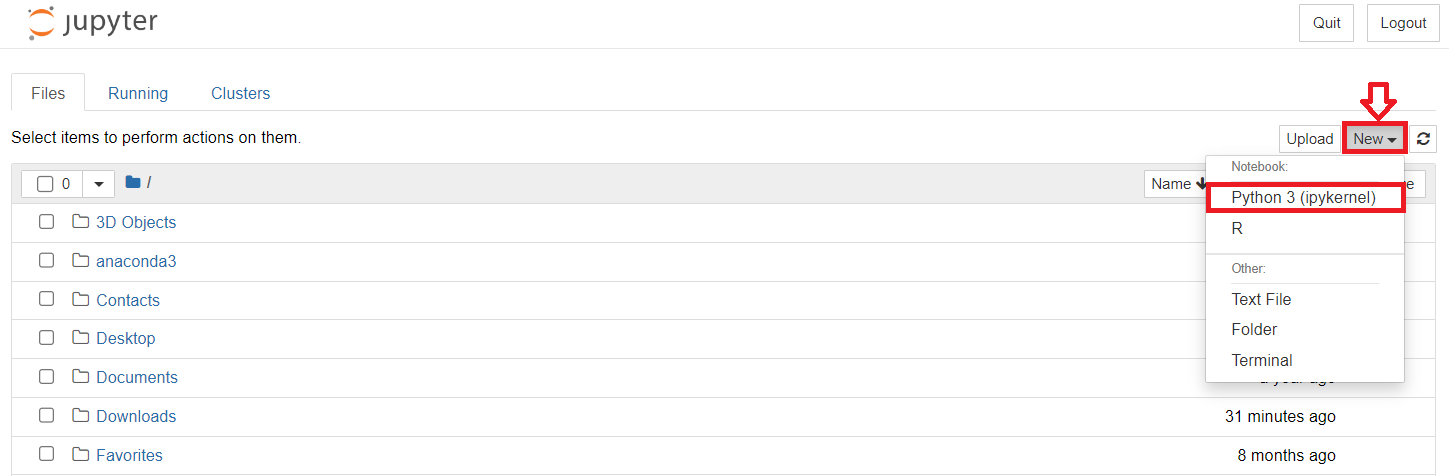
Step 5: This opens Jupyter Notebook in the default browser, and now you can select the kernel and create a Notebook.
第 5 步:这将打开默认浏览器中的 Jupyter Notebook,现在您可以选择内核并创建一个 Notebook。
Exercise 3: Create and execute Python Jupyter Notebook 练习 3:创建并执行 Python Jupyter Notebook
Step 1: Create markdown cells and add text 第 1 步:创建 markdown 单元格并添加文本
In your notebook, click any code cell, and in the drop-down menu, change the cell type from Code to Markdown. You will notice that you cannot create Markdown cells without first creating and converting them from Code to Markdown.
在您的 Notebook 中,点击任意一个代码单元格,并在下拉菜单中,将单元格类型从 Code 更改为 Markdown。您会注意到,在首先创建并将其从 Code 转换为 Markdown 之前,您无法创建 Markdown 单元格。

In the Markdown cell, write some text like My First Program.
在 Markdown 单元格中,输入一些文本,例如"My First Program"。
To render the Markdown text, make sure the cell is selected (by clicking within it), and press Play in the menu or Shift+Enter.
要渲染 Markdown 文本,请确保选中单元格(通过点击单元格内部),然后在菜单中点击播放按钮或按 Shift+Enter。
# My First Program
Your Markdown cell should now be rendered!
现在您的 Markdown 单元格应该已经被渲染了!
Output 《技能网络编辑器》
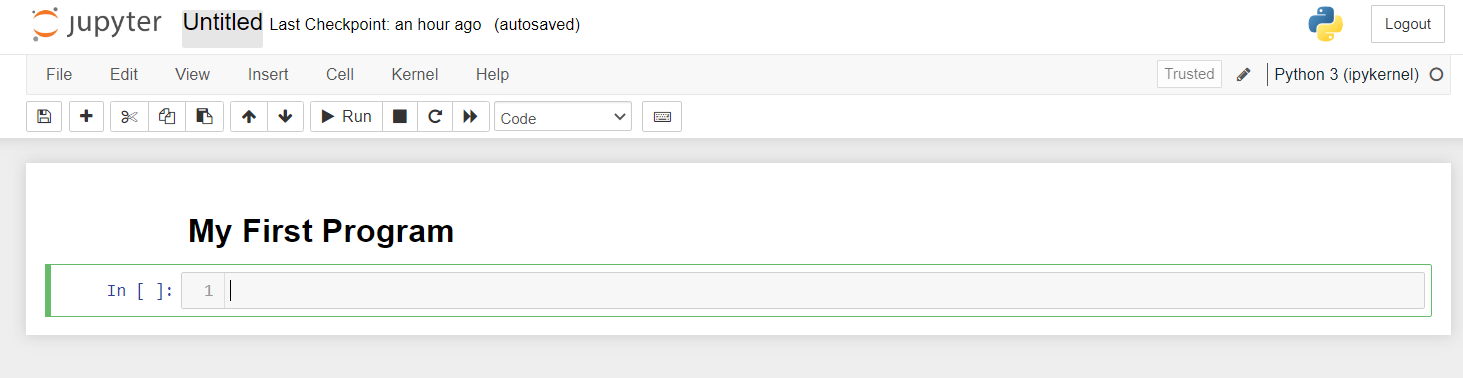
Note: To edit your Markdown cell, double-click anywhere within the cell. Note you can use the keyboard shortcut: [m] - Convert Cell to Markdown.
注意:要编辑您的 Markdown 单元格,请双击单元格内的任何位置。请注意,您可以使用键盘快捷键:[m] - 将单元格转换为 Markdown。
Step 2: Create new cells. 第二步:创建新单元格。
- In your Jupyter Notebook, click any of the existing cells to select the cell.
在您的 Jupyter Notebook 中,点击任意现有单元格以选中该单元格。 - Click Insert Cell Above or Insert Cell Below to insert the cell from the Insert menu.
点击“插入”菜单中的“在上方插入单元格”或“在下方插入单元格”以插入单元格。
Output 《技能网络编辑器》
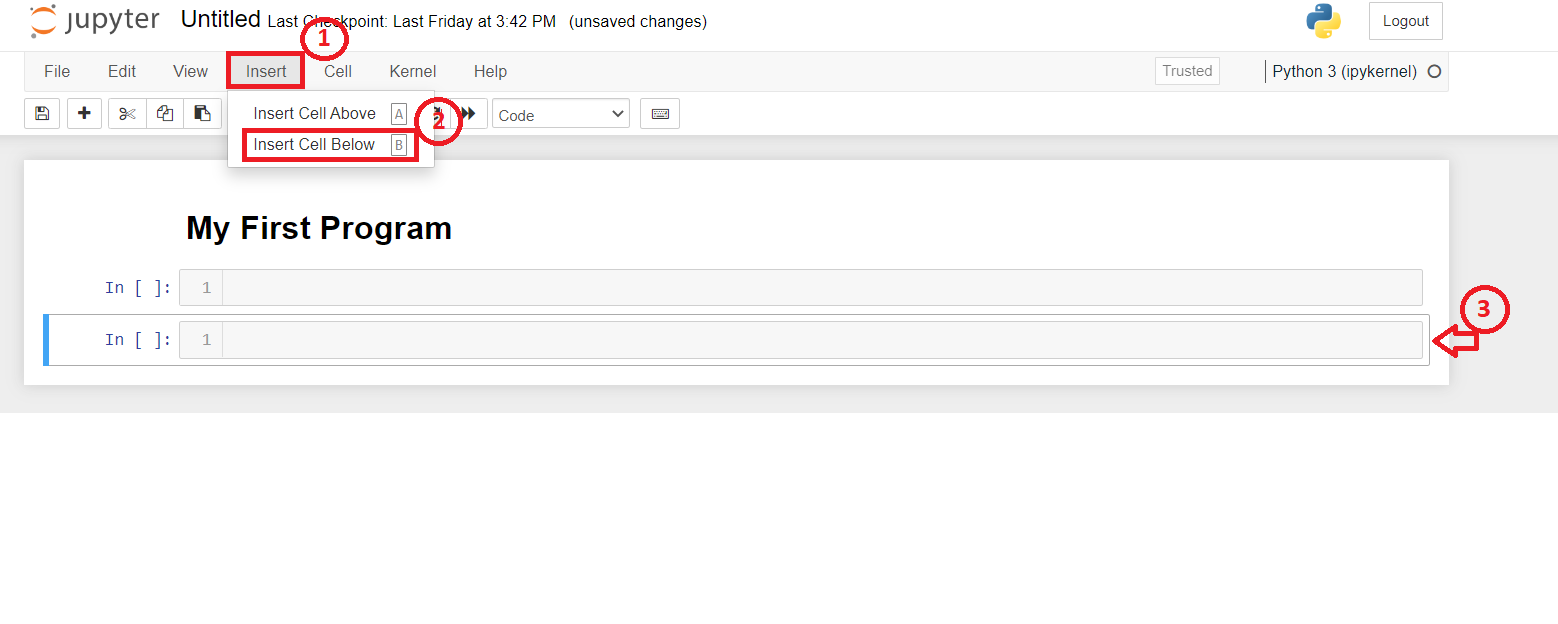
Note: You can use the keyboard shortcuts: [a] - Insert a Cell Above; [b] - Insert a Cell Below.
注意:您可以使用键盘快捷键:[a] - 在上方插入单元格;[b] - 在下方插入单元格。
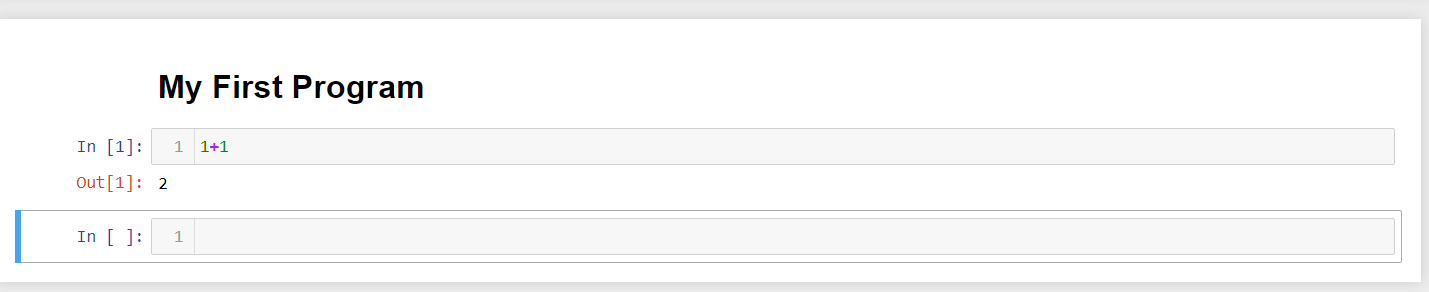
Step 3: Write and execute code. 步骤 3:编写并执行代码。
- In your new empty notebook, click within the gray code cell and write some code, like.
在你的新空白笔记本中,点击灰色代码单元内并编写一些代码,例如。
1+1
- Execute the code by clicking the Play button in the menu above the notebook or pressing Shift+Enter on your notebook.
通过点击笔记本上方菜单中的播放按钮或按笔记本上的 Shift+Enter 来执行代码。 - You should see the output 2.
你应该看到输出结果 2。
Output 《技能网络编辑器》
4. Rename, Shutdown kernel, and Save your Notebook 4. Rename,关闭内核,并保存您的笔记本
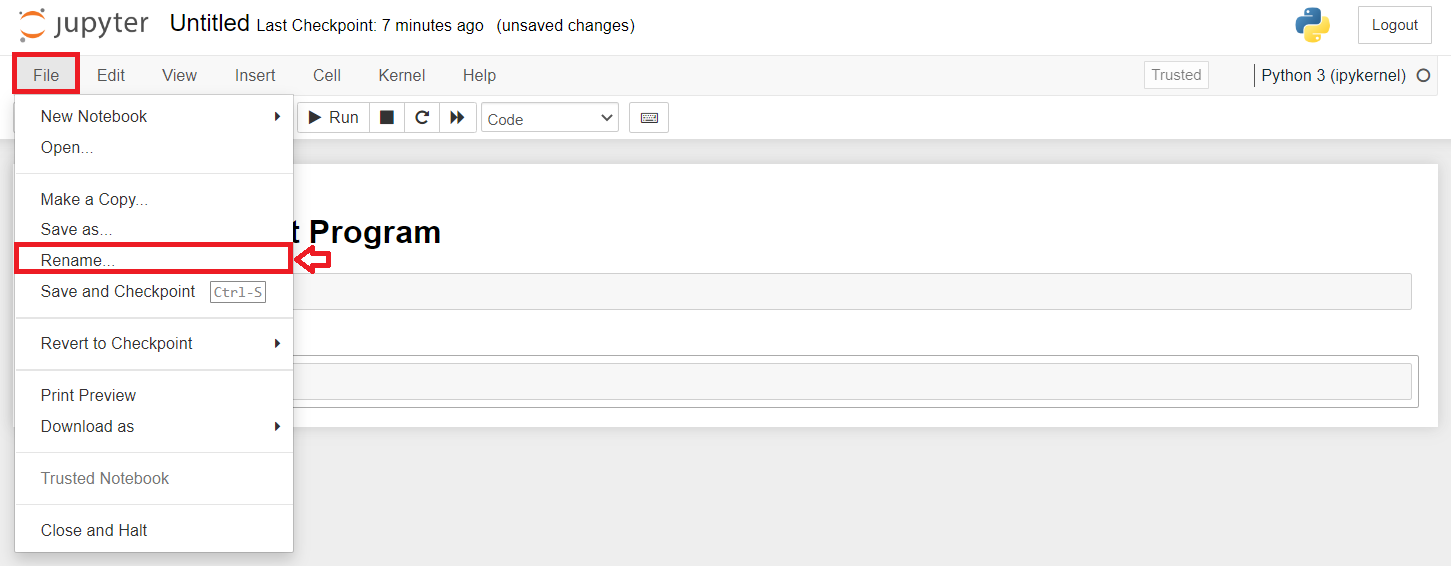
Step 1: Click Rename from the File menu to rename your notebook like My_Notebook.ipynb.
步骤 1:从文件菜单中点击重命名,将您的笔记本重命名为My_Notebook.ipynb.
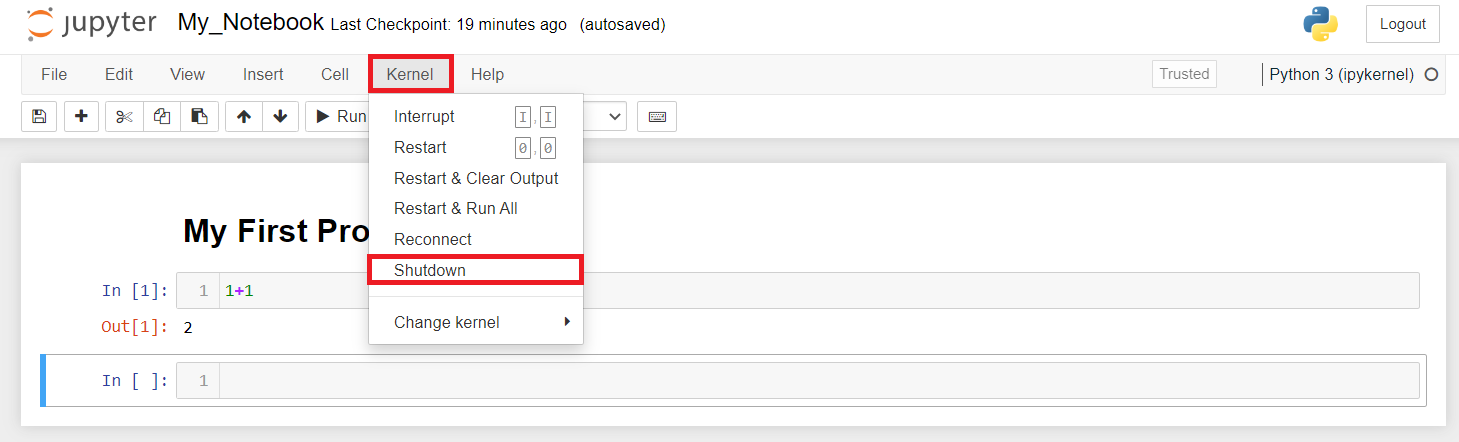
Step 2: To shut down the kernel, click Shutdown from the Kernel menu.
步骤 2:要关闭内核,从内核菜单中点击关闭。
Step 3: Click Save Notebook or Save Notebook as to save the notebook from the File menu.
步骤 3:从文件菜单中点击保存笔记本或另存为笔记本以保存笔记本。
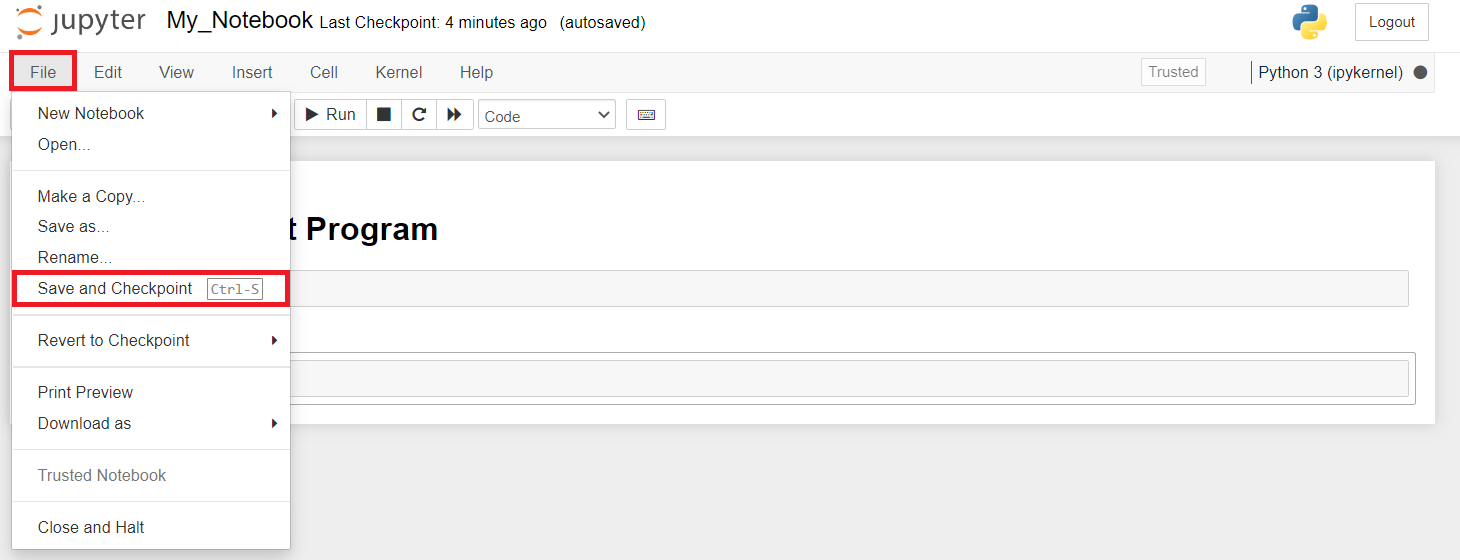
5. Open the recently created notebook. 5. 打开最近创建的笔记本。
Step 1: Open Anaconda Navigator from the Windows Start menu and launch Jupyter.
步骤 1:从 Windows 开始菜单中打开Anaconda导航器,并启动Jupyter。
Step 2: Go to the directory where you saved your file and click to open it.
步骤 2:进入你保存文件的目录,并点击打开它。
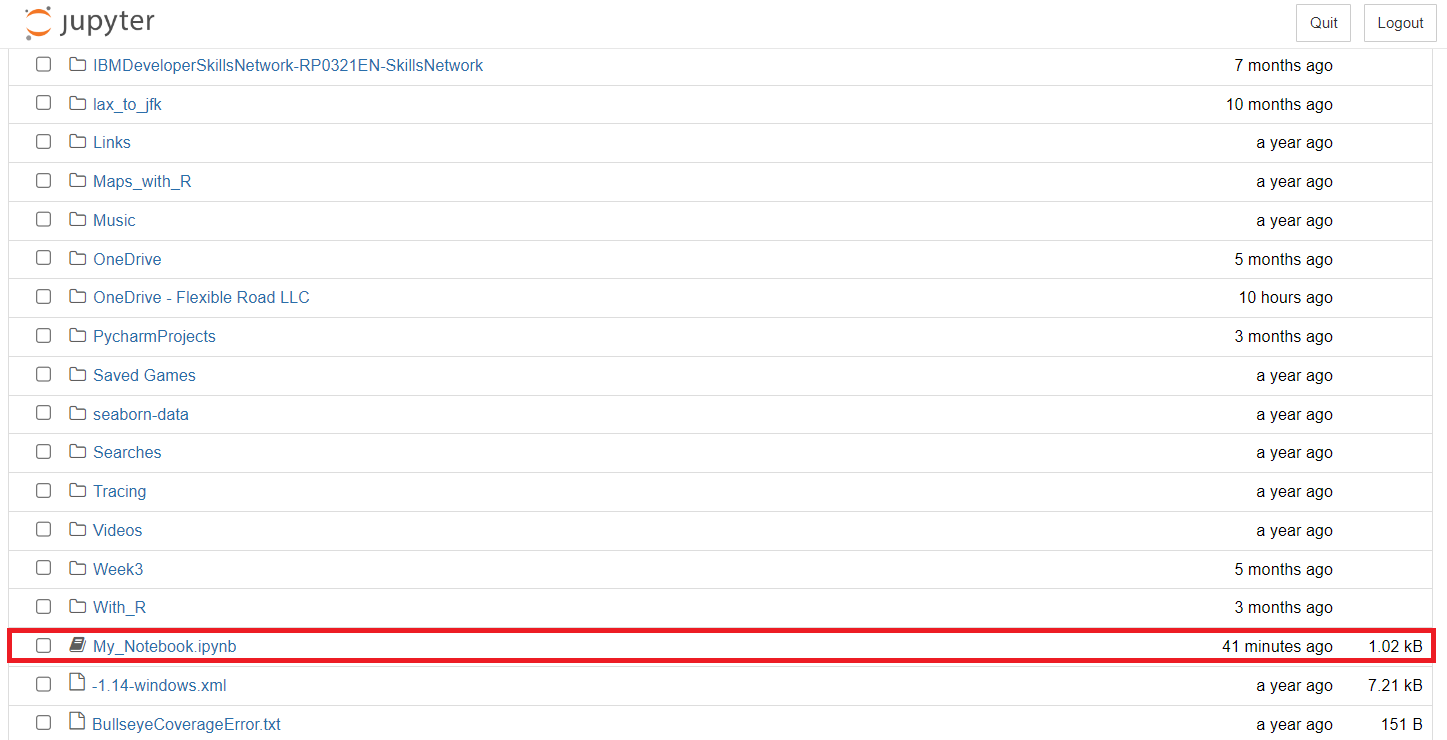
Practice Exercise 实践练习
Let us try executing simple math operations 让我们尝试执行简单的数学运算
Problem 1: Find the minimum and maximum values. 问题 1:找出最小值和最大值。
x = min(5, 10, 25)
y = max(5, 10, 25)

print(x)
print(y)
Output 《技能网络编辑器》

Problem 2: Find the value of 4 to the power 3. 问题 2:求 4 的 3 次方。
x = pow(4, 3)

print(x)
Output 《技能网络编辑器》

Exercise 4: Create and execute R Jupyter Notebook 练习 4:创建并执行 R Jupyter Notebook
Select the kernel and create a Notebook. 选择内核并创建一个笔记本。
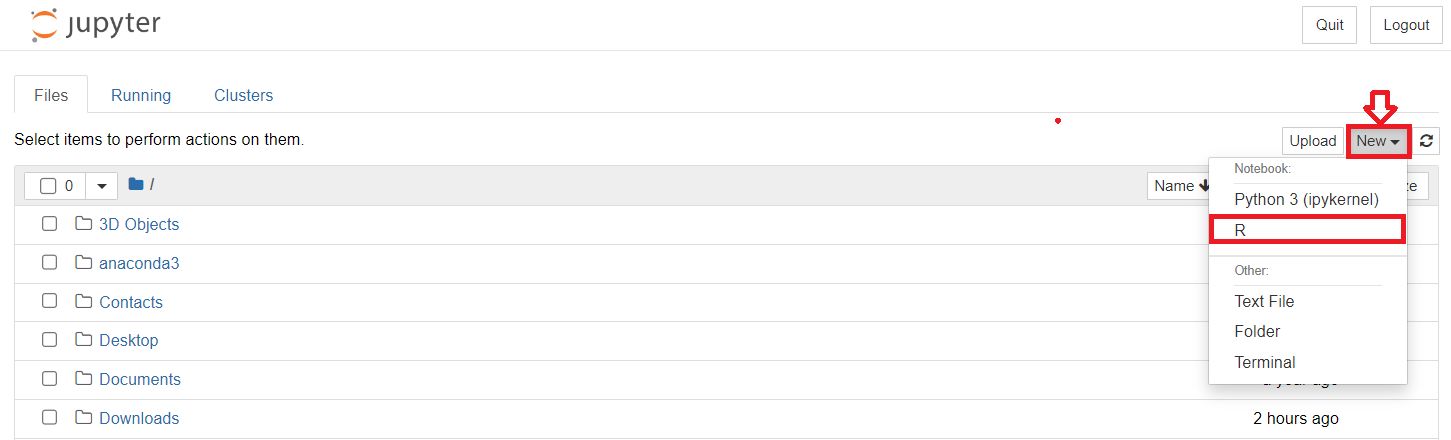
Problem 1: Find the Multiplication of 2 numbers. 问题 1:求两个数的乘积。
2 * 3 # Multiplication
Output 《技能网络编辑器》

Problem 2: Find the Subtraction of 2 numbers. 问题 2:求两个数的差。
4 - 1 # Subtraction
Output 《技能网络编辑器》

Problem 3: Add 2 to the given number. 问题 3:给定一个数,加上 2。
a <- 1 # Assigning 1 to the variable called "a"
a + 2 # Adding 2
Output 《技能网络编辑器》

Problem 4: Create a data frame 问题 4:创建数据框
df = data.frame(Emp_Name = c("Jai", "David", "Michael"),
Job_role = c("Manager", "Team Lead", "Developer" )
)

print(df)
Output 《技能网络编辑器》
